3 Generic Things to Know
This is a brief overview of the entirety of the graphics behind a 2d game. You'll come across these terms quite often throughout the use of the kit as well as the documentation.
1. Sprites
Any 2d image used in 2d games is called a Sprite. They can be either static(in case of buildings, trees and other objects) or animated(in case of a player or enemy character).
You'll be working with 2 things throughout the use of this kit with 2d Toolkit:
1. Sprite Collection
2. Sprite Animation
Sprite Collection:
A Sprite Collection is simply a collection of images stored within a Sprite editor. It is a part of 2d Toolkit and can be created by simply right clicking anywhere in the Project view (not on the game scene or hierarchy!) and going to Create>tk2d>Sprite Collection. Like so:
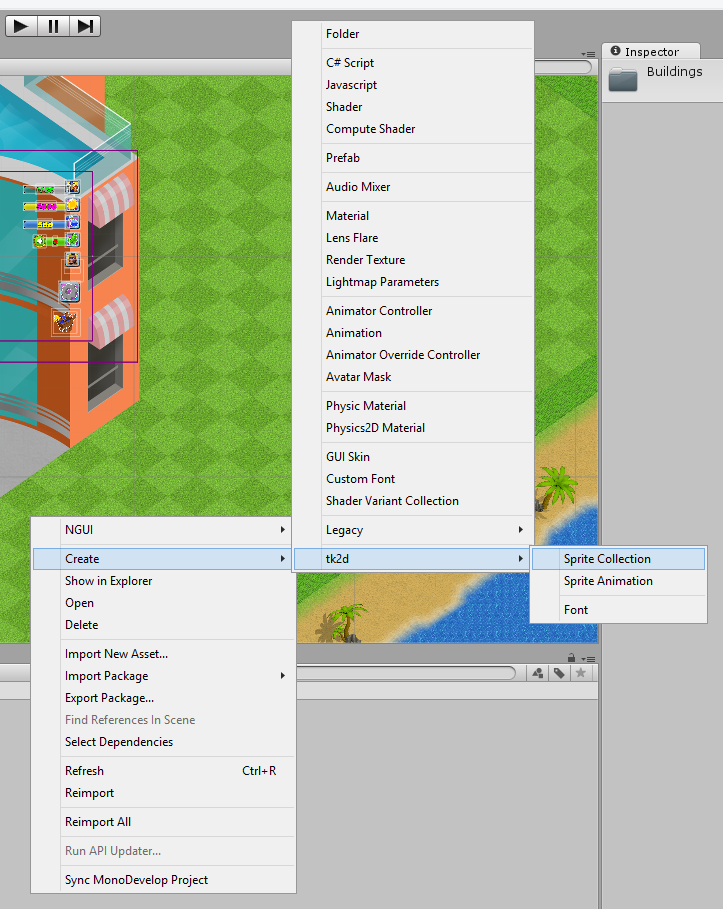
Click on the image to zoom.
It is not only used for cases like a set of images (like a group buildings that follow a theme) but it's also used to create a collection of images that are part of an animation.
Say for example you have a 2d character with a walk animation of 30 frames/images. To use them within the kit, you must first add all of these frames within a new Sprite Collection. Sprite Collections can also have multiple sets of animations, making sure that they are numerically named in proper sequence.
For example:
Walk Animation File Names: ManWalk001 to ManWalk030
Run Animation File Names: ManWalk101 to ManWalk130
Notice that in this example, both animations have 30 frames/images but the 1st digit of the 3 are different(for walk it is 0, for run it is 1). This file naming scheme is important as it'll allow you to automatically input the frames for animation(discussed later in Sprite Animation).
These collections can also be referred to as atlases throughout the documentation. They are also called within scripts whenever a Sprite needs to be called. In these docs, folders are specified where each category of Sprite Collection are stored and scripts have access to all collections used throughout the kit and can call Sprites by names from within their respective collection. Both Collections and the Sprites within are called from their respective drop down menus on the scripts. Like so:
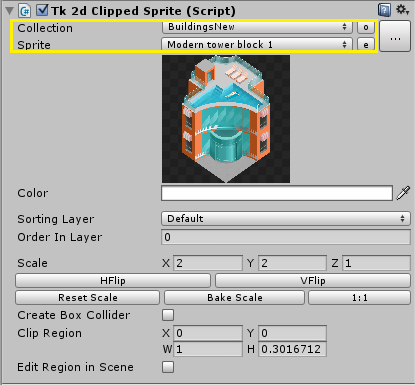
Click on the image to zoom.
Here is an example of a Sprite Collection of the buildings within the kit:
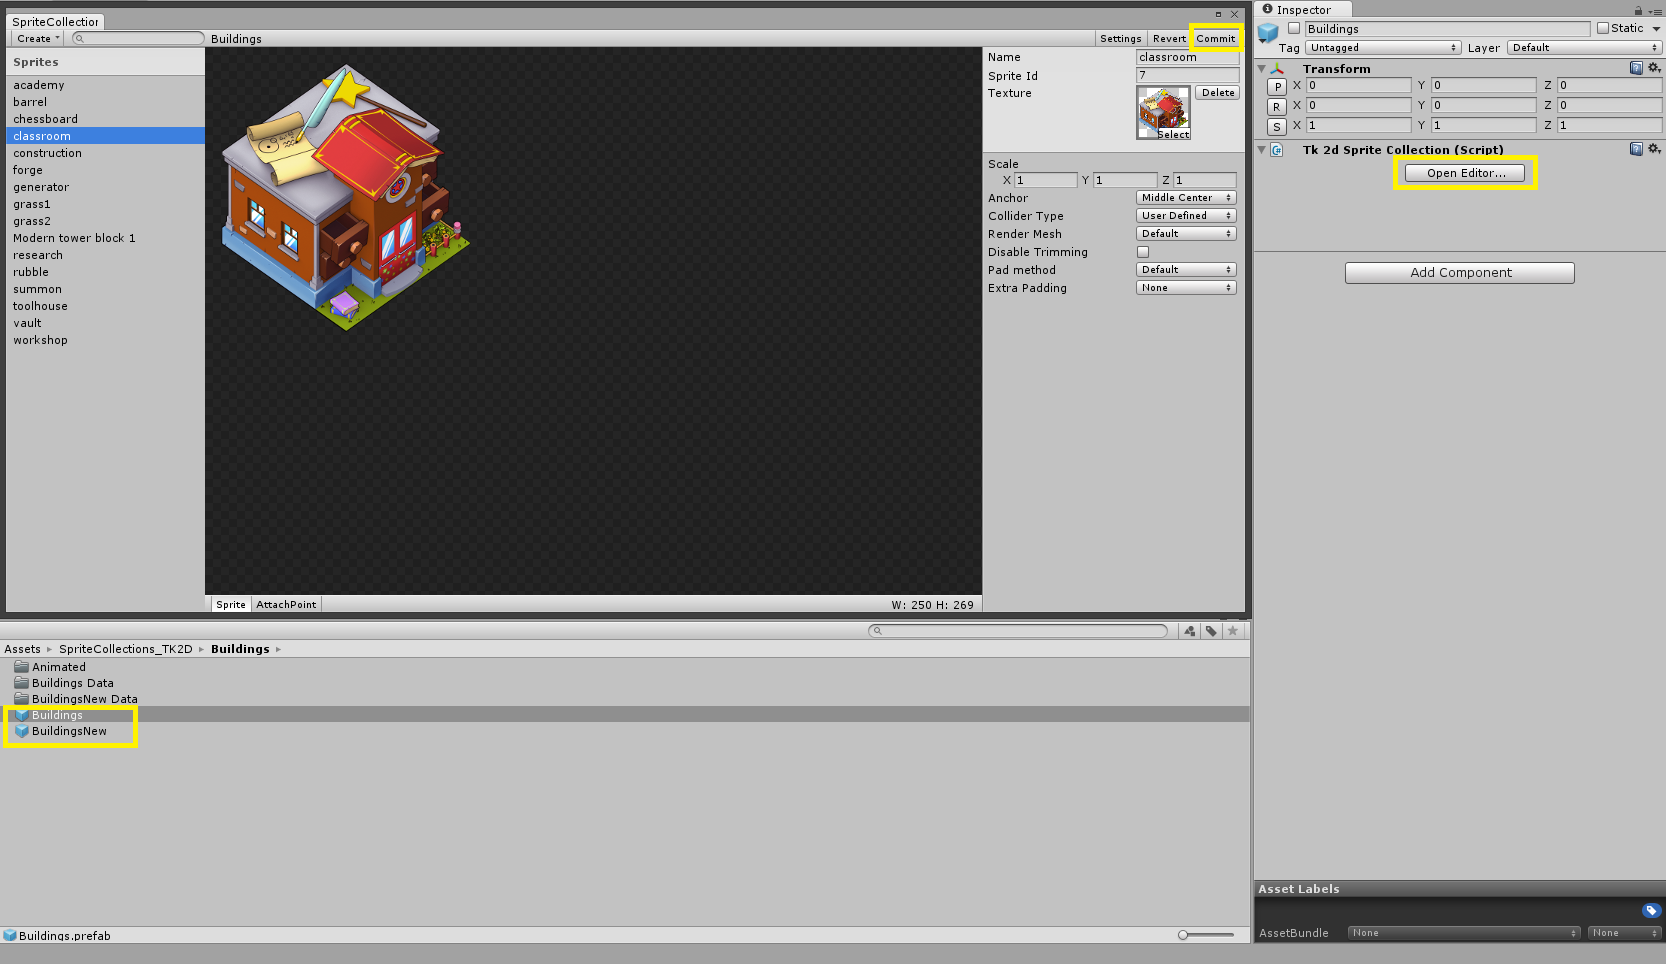
Click on the image to zoom.
To import, simply drag in the collection of images from the folder under the Projects folder navigation panel into the Sprite Collection you created and then click on the Comit button located on the top right corner of the Editor window.
Sprite Animation:
To Create:
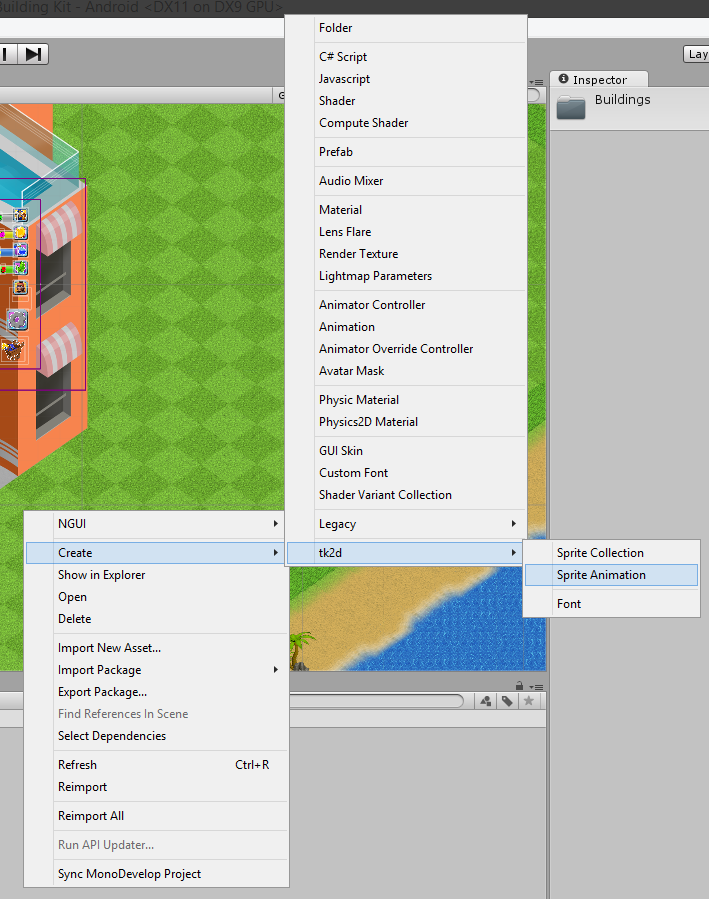
Click on the image to zoom.
As discussed above, Sprite Animation is a collection of a set of frames/images named sequentially. This collection is called from a Sprite Collection of sprites.
Too many Sprites and Collections in one doc!
Lets get a little technical:
Click on the image to zoom.
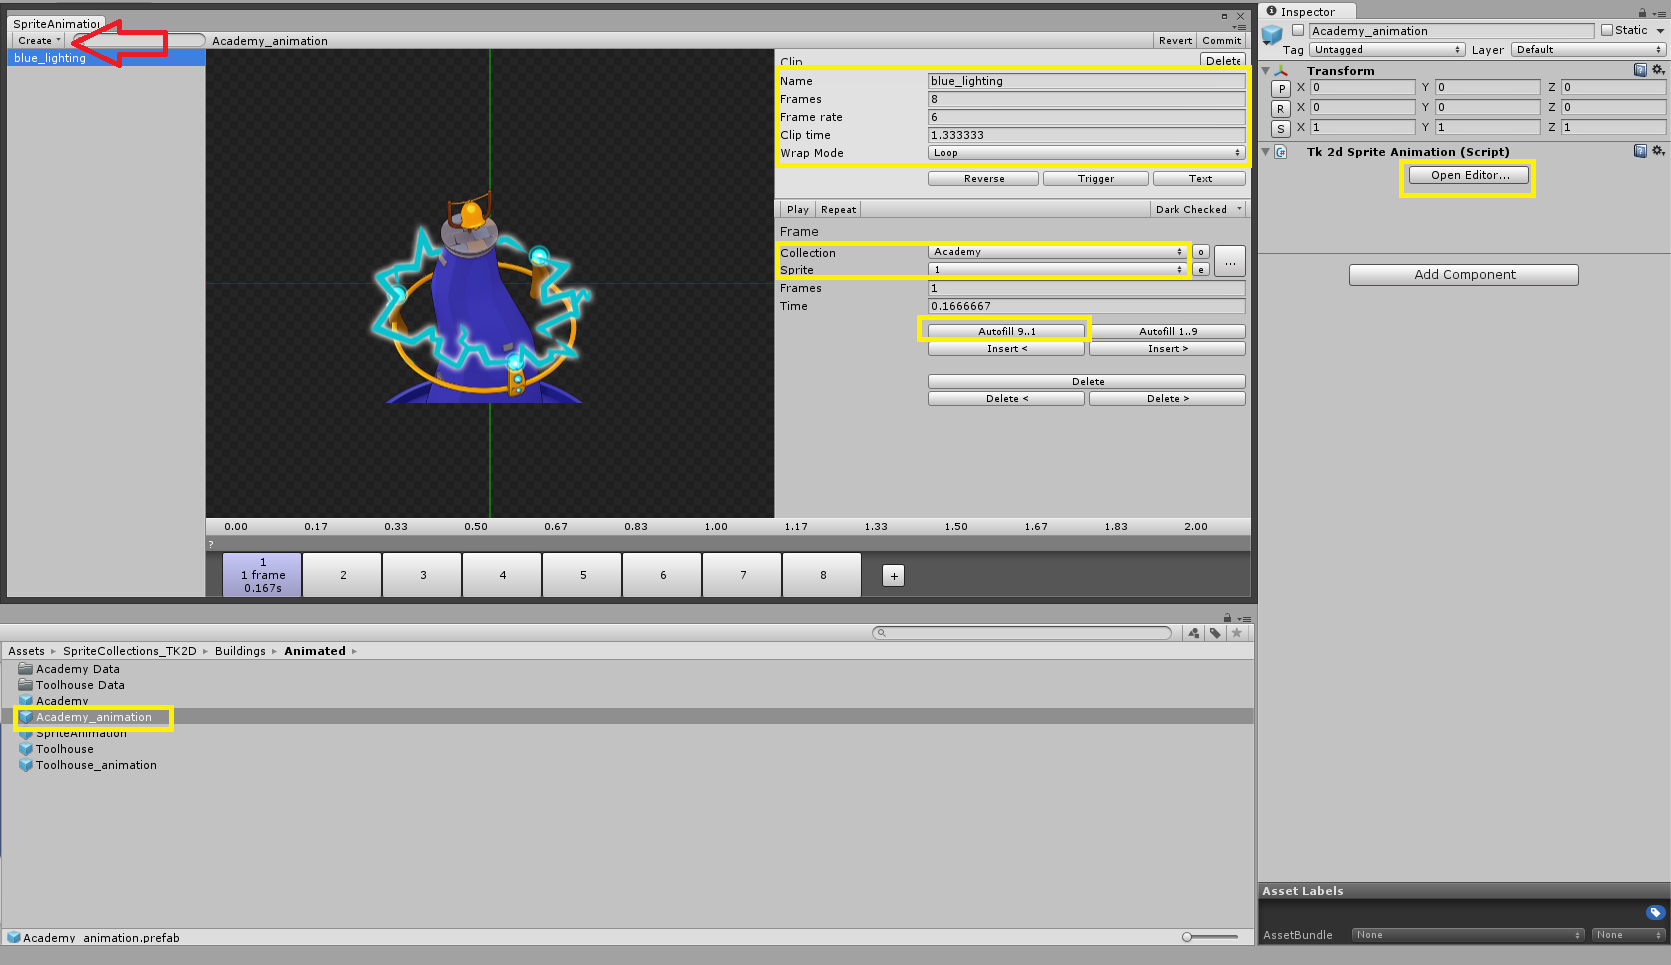
The red arrow in the image above is pointing to a Create button on the top left corner of the Editor window for a Sprite Animation file. Clicking it will show two options: Clip and Copy. They are as they sound, clip lets you create a new clip of an animation from a collection and copy copies the clip.
A clip is selected to show you what options are available. You may assign a name for the animation clip, for example: ManWalkE where E stands for East since every character/unit/creature animation needs to be set in 8 different directions: East, West, North, South, North-East, South-East, South-West and North-West so that he can be shown to traverse the 2d Tile Map in all directions.
The Speed of the animation can be controlled either via Frame rate or Clip time which are both available on the right side panel whenever a clip is selected. Adjusting one of these parameters will automatically change the other to make the math work.
The Wrap Mode will decide whether the animation will be looped or played once along with other options. You may playback your animation and it'll play in repeat which allows you to adjust the parameters in realtime and view the change which is highly productive.
Then you have the Collection and Sprite drop down menus whose functions should be perfectly clear to you by now. They'll allow you to call your collection of images for the clip you are trying to make.
Finally you have the autofill button which was discussed in Sprite Collection where correctly named sequences of frames will be filled in automatically for the clips which saves a lot of work load.
That wraps up the first thing you should know which are Sprites. If you wish to learn more, Google and Wikipedia have chunks of info on the topic. But the info discussed here will help you get started with this kit.
2. Tile Maps
Tile Maps are basically the land on which everything from objects to buildings to characters stand on. It can be the grass, sand or even the ocean. They are created via small tiles that are each Isometric in shape and follow a fixed dimension set for each image used with a tile. It's a very good idea to use the same dimensions for all of your tiles since they will be painted side by side and one would not desire "holes" in the middle of their map.
The 2d Toolkit has the ability to paint out such maps with tiles at ease and render them with maximum efficiency for mobile gameplay. With fairly a small collection of sprites/tiles, one can generate different lands/maps. Static Objects such as trees, rocks and other plantation are separate from the tilemap layer and are created differently, discussed on the Add Objects to Map page. They are much like buildings with their own collider set.
Why do we use tiles instead of a large image of the whole map?
Isn't that more efficient?
Short answer:
Oh Dear Lord...no...
Long technical answer:
iPhones/iPod Touches/iPads all have a Unified Memory Architecture which mean that both the CPU and GPU share system memory. There is no dedicated video memory and so a tiled environment is used over a pre-rendered, high quality image because a single 1024x1024 px ARGB32 Texture2D can use up to 4-8MB of memory.
Our island tile map example has a size of 17920 x 25340 px, each tile has 256x181 px. So without using tiles, a lot of memory would be consumed by the map alone. But with tiles, the source image of the entire base environment layer is a single 1024 px image, and the tiles are diced to reduce the total size of the image atlas/sprite collection. This is discussed once again with proper images on the 2D Graphics Manual page under the section Mobile's Limited Memory & Efficient Tiling.
This topic was just to give you a small preview. The creation of Tile Maps is discussed in great detail on the terrain page.
Each set of sprites exist on their own separate layers in order to properly show characters in the foreground/background and layering is discussed in better detail in the topic below. Tile Maps usually always stay at the bottom most layer.
3. 2d Layers & Colliders
2d Layers:
2d Layers are much like the layers on graphics editing programs like Photoshop or GIMP. If you have not used graphics editing software then simply put:
Imagine a piled stack of transparent papers. Each one has a different image painted on it. Lets say the paper at the bottom has the background of grass, the one above it has trees, then the one above has rocks and so on and so forth.
When one would look from the top of this piled stack, the full image would be visible. This is exactly how 2d Layers work in this kit as well as pretty much all 2d games. 2D means each layer has the x and y dimensions but additionally they possess a Z depth value which takes into account the foreground and background definitions when these layers overlap, for example a character walking behind a building or tree.
Usually objects like trees and rocks have a large collision area around their front as opposed to their back so that a moving character cannot step too close to the tree when in the foreground such that they overlap but will be able to travel behind the tree. More on colliders is discussed below. This makes life simple when placing tree or rock objects as we only need to make sure its Z depth is higher or it's in a more elevated layer in contrast to the characters(whether playable or enemy) so that it appears in front of the character at all times since we only need to worry about the background. But in case these objects aren't just on the sides of the map but also around the middle area, they too can be spliced to a top and bottom half to allow proper foreground/background viewing.
So the million dollar question is, how does this work when it comes to buildings where the character is able to appear both in front and behind buildings or construction sites?
Magic? Witchcraft? Complex scientific math?
None of the above.
It's as simple as a cutoff region within the building or any other large object that needs to be able to show characters both in front and behind it. You will find details on how this is done when you create your own buildings which is discussed under Player Village>Replace Static/Animated Buildings section in the documentation.
So how does this work?
-
A building will be cropped into a top and bottom portion.
-
The Top portion will be elevated to a Z depth which is above that of the character layer so that when they overlap, the characters appear behind it.
-
The Bottom portion will be, you guessed it, at a Z depth below that of the character layer so that the characters may appear in front of it when overlapping occurs.
-
This cutoff region is best determined by the maximum height of the playable character and the colliders that will be surrounding the building to ensure the character does not set foot too far in or get too close to the cutoff region. There are preset values within this kit so there is nothing to worry about and all this talk of cutting off buildings may seem difficult, but it's not. The instructions are very detailed and the cutoff happens through code and in most cases do not even need to be touched since using default building sizes like those in our kit will allow your own building prefabs to work out of the box.
Once you begin making your own building prefabs, all of this will become a lot clearer. This is to give you a taste of how things work.
Colliders:
Collision is just as it sounds and you have probably come across this term in games. In the old days of gaming, it used to be this invisible wall you hit while playing and now it's as sophisticated as a message popping up when you're close to a collider that asks you to turn around as you cannot go further.
2D games also rely heavily on collision. The colliders are applied on the tiles and this is very important since the kit uses scripts that have AI to create paths which avoid tiles that are obstacles/collidable. When a single tile is set to be a collider(by using an obstacle tag), characters will never be able to traverse over the tile and the path creator will never use these tiles to calculate paths to get to the location a player is trying to get to. The use of obstacles or colliders is important as an inefficient design can lead to characters not being able to properly traverse the map or even reach certain areas.
Colliders on objects like trees and rocks must be applied manually as maps will usually have them for decorations so having one attached to the prefab is not as efficient as creating a unique boundary of colliders for a specific location taking the aesthetics of the placement of the objects into account.
Colliders on building prefabs are automatically generated as the user will be able to tap and place them wherever the game will allow thus they need to fall properly on the underlying grid. This is achieved through the building creator scripts and all of it is automated so following the steps to achieve this will suffice. You will find more detail on this under the Player Village>Replace Static Buildings section in the documentation.
Hopefully this brief preview of these topics have been helpful and they are all discussed in more depth about their uses in the kit in other parts of the documentation.
Updated less than a minute ago
