Walls
Reminder - Keep Daily Backups
When working on a strategy game with a kit as big as the Complete Kit - always keep a working daily backup! Save yourself the trouble of rolling-back changes and losing work.
Like all of the structure shown in the documentation, all of them are actually A SINGLE multi-functional StructureCreator that builds anything, different prefabs and XML descriptors; this includes array-builds, for walls and fences, instant builds (without construction sequence).
What are walls?
Walls are used in city building games for decoration and in strategy games for defense. In the City Building Kit we've included a section of the store for your game to include and sell different types of wall structures. Unlike the defensive structures, walls don't have any actual value in offensive defense and unlike the resource or military buildings walls don't have any storage value for the player.
How do they appear in the store?
In the UIAnchor - center main store item, you'll find the walls element which contains everything you see in the below screenshot.
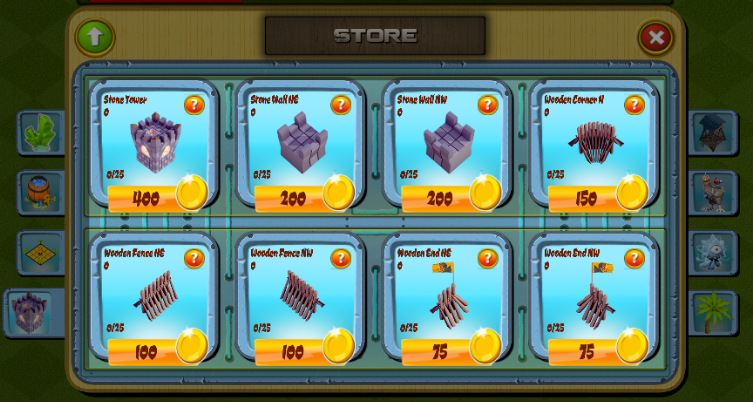
Walls in the store. Click to view larger.
Where to find the walls store menu in Unity?
Open the game scene hierarchy and locate the ScrollViewFort in UIAnchor > Anchor - Center > Shop > Main. Look at the below screenshot.
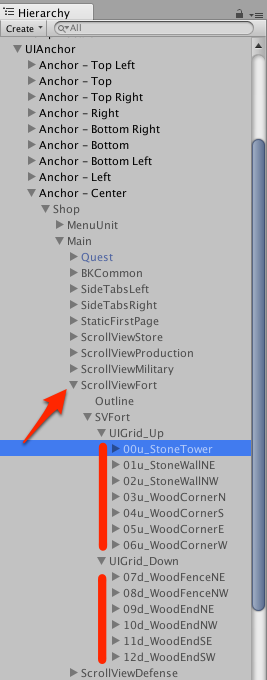
UIAnchor. Click to view larger.
Where are the prefabs?
All of the game object prefabs are set in the Game scene Game manager. Look at the below screenshots for the first location to find where prefabs are set.
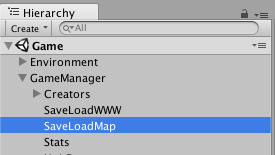
Game scene Game Manager > SaveLoadMap
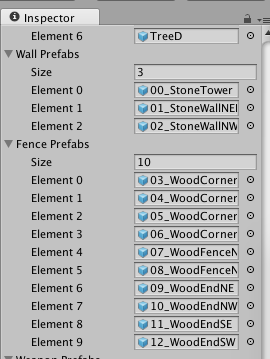
Inspector Walls prefabs. Click to view closer.
In addition, you will want to look at GameManager > Creators > WallCreator (prefabs are also there) and Map01 scene > SaveLoadBattle. This is discussed in the Buildings > Part 2: Customize Menus section of the documentation. Prefabs are used by the creator for construction and by SaveLoadBattle for loading during battle.
GameManager > Creators > WallCreator
In the GameManager > Creators > WallCreator we have the list of game object prefabs used by the creator in addition to certain build settings used by the Scripts/Creators/BaseCreator.cs script. Let's describe these below. But first, here's how to open the WallCreator Inspector.
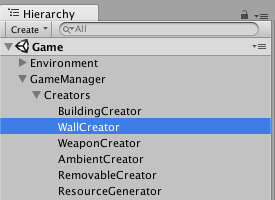
Game scene Game Manager
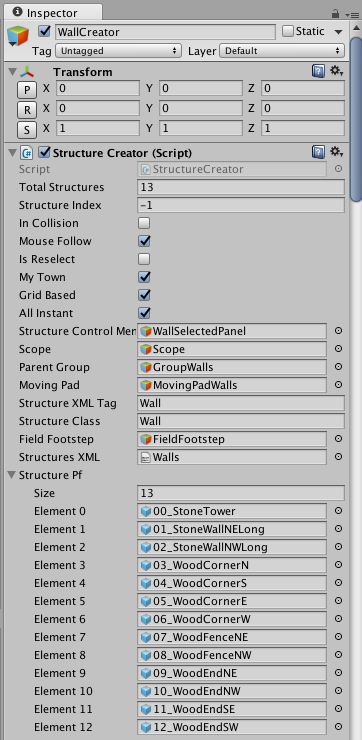
Wall prefabs in the WallCreator Inspector
In the Inspector you'll notice a few arrays, here's a description of each one. It's the same for every type of game object you can build in the game except for the RemovableCreator (removables are not for players to construct but rather remove -- see Player Removable Objects doc for details)
| Array Title | Description |
|---|---|
| Structure Pf | The structure prefab. Order in this list matches the exact order of the XML items which the Creator matches the prefab with. |
| Grass Pf | 1x1 to 5x5 dark green grass collider grid prefabs list. These you don't have to edit, they are shared by all structures in the game based on their grid size. |
| Construction Pf | Under construction prefab list. There's 3 different sizes of this for 1x1 to 3x3 grid size construction projects. |
| Grass Types | Size of this array matches the the Structure Pf array size. We tell which Grass Pf element to use with each structure. Depends on structure size whether they take 1x1 (Grass Pf element 0) like a wall segment or 3x3 (Grass Pf element 2) like the large gold vault. Tatami is the only object that takes grass collider 5x5 ( Grass Pf Element 4). |
| Construction Types | Array size matches Structure Pf. Like grass types, we match the construction prefab grid size too. Since there's 3 different sizes of construction prefabs, this ranges from values 0 to 2. By default, we set most structures to use the 3x size. |
| Pivot Corrections | Array size matches Structure Pf. Odd size grid structures (1x1 and 3x3) need a pivot correction so they don't appear accidentally off-center, taking more grid space than necessary. Pivot Correction does this. |
| Is Array | Array size matches Structure Pf. If set to 1, uses the row making field builder for construction instead of the usual construction. The only objects that use this are the wall segments that let you pick a start and end point and automatically constructs a repeating row of the structure between the points. |
| Is Instant | Array size matches Structure Pf. For items you set TimeToBuild to 0 (instant build) in the XML, you also want to set the elements Is Instant boolean to 1 in this array. The only objects that use this in the demo are the wall segments. |
Inspector: Is Array booleans
In the BaseCreator.cs script, the Verify function checks if the building is an array or not. This function in BaseCreator.cs determines whether we are placing one object (a building) or a row of objects (like fields, or walls).
There's more details about the special functions for building field rows below in this documentation page, however it all starts here with the Is Array booleans in the WallCreator Inspector. Usually for all other inspectors this is set to 0 to treat each building as a single object and not a row of objects.
For the walls we set these 4 element (seen in the screenshot below) which are the repeatable wall segments to Is Array equal to true. You'll notice the array size for both the Structure Pf and the Is Array are equal, and that the values match to the prefab you set. Keep this in mind in case you change these original prefabs with your own and do not keep the same order. (We recommend if you customize the kit to use the same order as the samples for an easier customization)
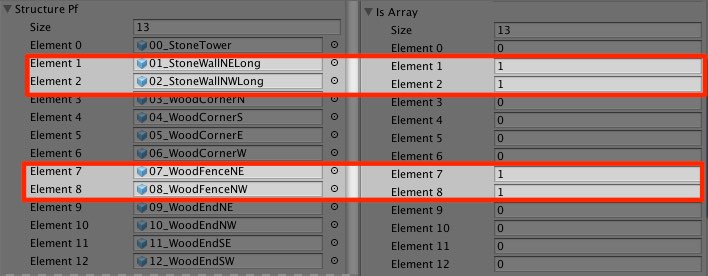
Inspector: Is Array booleans
Inspector: Is Instant booleans
For all buildings - we use the time delay construction. However for instant construction projects like the walls, you want to mark the Is Instant boolean true in the Inspector, for the element in this array matching the same prefab element above. In this case all of the walls are instant builds, so we've set them all to true, and also set the TimeToBuild element of the XML/wall.xml items all equal to zero.
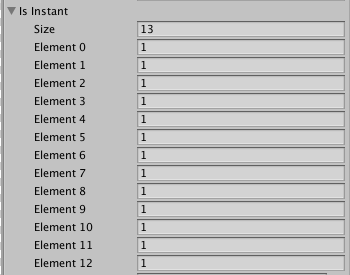
Inspector: Is Instant booleans
XML Sample
Here's an example of one of the wall elements from XML/Walls.xml used by the centralized creator script Scripts/Creators/BaseCreator.cs
<Wall>

		<Name>Stone Tower</Name>
    <!--  name displayed in the store -->

		<Currency>Gold</Currency>
    <!-- save as 0 Gold 1 Mana 2 Crystals to buy -->

		<Price>400</Price>
    <!-- amount of resource necessary to pay for the building -->

		<TimeToBuild>0</TimeToBuild>
    <!-- the time (in minutes) needed to create the building -->

		<Life>400</Life>
    <!-- hitpoints for the building in battle  -->
    <!-- Note: the earlier City Building Kit 6.0 version pathfinding avoids  -->
    <!-- and does not actively attack walls  -->
    <!-- Later versions after this do. -->

		<XpAward>2</XpAward>
    <!-- experience awarded for the completion of building one wall segment -->

	</Wall>
Please view the Shop menu > Defense Walls documentation page for more details about XML and the shop menu.
Example #1 - Wooden Walls
There are two types of wall examples provided with the kit. You can customize both of these types or add your own. The first are wooden walls which hold a lower Life value than Stone walls.
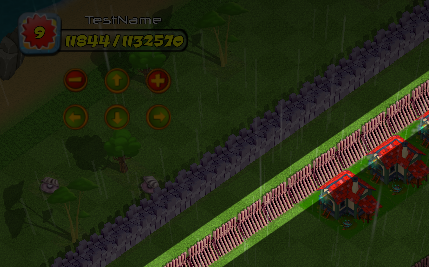
Wooden wall row example
The following is an XML excerpt for these:
<Wall>
		<Name>Wooden Fence NW</Name>
		<Currency>Gold</Currency>
		<Price>100</Price>
		<TimeToBuild>0</TimeToBuild>
		<Life>100</Life>
		<XpAward>1</XpAward>
</Wall>
Example #2 - Stone Walls
The second type of wall examples provided with the kit are stone walls which hold a higher Life value than wooden walls. Again, you can customize all of the settings in the kit, using what you want and changing what you wish. Keep the walls or add your own.
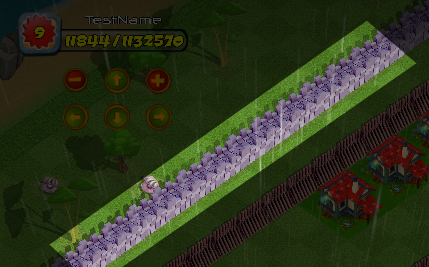
Stone wall row example.
And the XML excerpt for the stone wall.
<Wall>
		<Name>Stone Wall NE</Name>
		<Currency>Gold</Currency>
		<Price>200</Price>
		<TimeToBuild>0</TimeToBuild>
		<Life>200</Life>
		<XpAward>2</XpAward>
</Wall>
Instant built
The TimeToBuild element in the XML is used by Scripts/Creators/BaseCreator.cs building constructor to instant build the wall. By default, the same construction script runs for all buildings, structures, walls, etc.
Walls act like a normal structure, except for the TimeToBuild which is defined as 0 (for 0 minutes) so the construction happens instantaneously.
<TimeToBuild>0</TimeToBuild>
		<Life>400</Life>
Constructing rows using the Field Builder
Walls are treated in two different ways, one of them is corners and towers which are like normal construction projects. Meanwhile for constructing rows - we've applied the same concept that can be used to create rows of any object, such as grass or farm fields. At the bottom of the BaseCreator.cs file you'll find the functions for building fields (or walls).
A few functions in Scripts/Creators/BaseCreator.cs work together when creating rows. The keyword you want to look for is fields - since we use the same scripting that could be applied to planting a field of flowers or a field of any object.
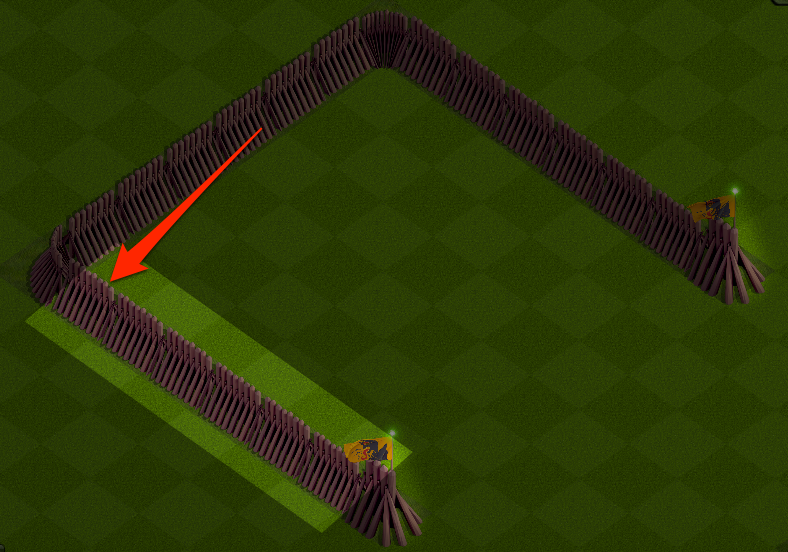
Starting a row, you first need to click one of the spots. Click to view larger
The difference between building walls or building fields starts in the Verify function which is triggered by the NGUI buttons in the store.
// BaseCreator.cs
// This function runs when one of the NGUI store buttons is pressed
// Here we determine whether it's a normal building or a wall (field) structure
//
	private void Verify()
	{
		if (isArray[currentSelection] == 0)
		{
      // Building a normal structure
			VerifyConditions ();
		}
		else
		{
      // Building a row using the Field Builder
      // these two variables are important
      // they're used throughout BaseCreator.cs to determine
      // between building normal structures and buildings rows, or fields

			isField = true;
			drawingField = true;
			Delay ();
			VerifyConditions ();
		}
	}
The two variables isField and drawingField above are very important. They set all of the following functions that run to build normal structures to instead trigger certain parts relating to building rows, or fields.
First, we load VerifyConditions() which operates as described in Shop menu > Defense Walls documentation page. VerifyConditions first checks if they have the resources, builder available, and other settings to be able to build at least one object. If they do, InstantiateStructure() is triggered which sets up a few settings necessary for the creation and then calls SelectStructure()
// BaseCreator.cs
// Excerpt from SelectStructure()

// For normal buildings, we calculate the position
if(!isField)
		{
			posX = (int) (Scope.transform.position.x-		//calculates the middle of the screen - the Scope position,
				Scope.transform.position.x%gridx); //and adjusts it to match the grid; the dummy is attached to the 2DToolkit camera
			posY = (int)(Scope.transform.position.y-
				Scope.transform.position.y%gridy);
		}
		else
		{
    // But for building fields (walls) we capture the start point when the player clicks on a spot
			posX = (int) spawnPointList[currentFieldIndex].x;
			posY = (int) spawnPointList[currentFieldIndex].y;
		}
Meanwhile, the Update() function is running once per second and has started listening to the player's mouse click location since the drawingField boolean was set to true above.
// BaseCreator.cs
// Excerpt from Update()
// The update function runs once per second
// Listens for various changes. In this case we're listening for the mouse click
// event to locate where the player will start building.

		if (drawingField)
		{
			if(!((Relay)relay).delay && Input.GetMouseButtonUp(0))
			{
        // We record the start of the field
				RecordSpawnPoint();
			}
		}
RecordSpawnPoint() basically does two things - it marks the grid coordinate for the start of the field (wall) and then sets the startField boolean to true and waits for the next click from the player.
The next click will first be checked if the click is on the same row or column otherwise we ignore it since the second click location is not straight from the point they started building the field.
Rows or columns can only be straight across the grid field - like seen in the above image - you can't build a row cutting through a your game grid.
// BaseCreator.cs
// RecordSpawnPoint() is triggered by the mouse click
// as reported by the Update() function once per second
// since drawingField boolean is set to true.

	private void RecordSpawnPoint()
	{
		Vector3 pos = new Vector3(0,0,0);
		Vector3 gridPos = new Vector3(0,0,0);

		// Generate a plane that intersects the transform's position with an upwards normal.
		Plane playerPlane = new Plane(Vector3.back, new Vector3(0, 0, 0));//transform.position +

		// Generate a ray from the cursor position

		Ray RayCast;

		if (Input.touchCount > 0)
			RayCast = Camera.main.ScreenPointToRay(Input.GetTouch(0).position);
		else
			RayCast = Camera.main.ScreenPointToRay(Input.mousePosition);

		// Determine the point where the cursor ray intersects the plane.
		float HitDist = 0;

		// If the ray is parallel to the plane, Raycast will return false.
		if (playerPlane.Raycast(RayCast, out HitDist))//playerPlane.Raycast
		{
			// Get the point along the ray that hits the calculated distance.
			Vector3 RayHitPoint = RayCast.GetPoint(HitDist);

			int indexCell = GridManager.instance.GetGridIndex(RayHitPoint);

      // get the column and row from the grid
			int col = GridManager.instance.GetColumn(indexCell);
			int row = GridManager.instance.GetRow(indexCell);

			// first check that there is no existing structure on the point
			if(!GridManager.instance.nodes[row,col].isObstacle)
			{
        // if they haven't clicked yet, this part runs first
        // so we can place the point they first clicked
        // at the end of this part we set startField boolean = true
				if(!startField)
				{
					if(!FieldFootstep.activeSelf)
					{
            // we actiavte the FieldFootstep game object
            // which is the flagpole seen in the game

						FieldFootstep.SetActive (true);
						FieldFootstep.GetComponentInChildren<GrassCollider>().collisionCounter=0;
						FieldFootstep.GetComponentInChildren<GrassCollider> ().inCollision = false;
					}
					// record the position and create a star above the grid
					gridPos = GridManager.instance.nodes[row,col].position;
					startPosition = gridPos;
					startCell = indexCell;
					startCol = col; startRow = row;
					StartCoroutine(CreateStar (gridPos,row,col));
          // set boolean so next time the second half of this function below runs
					startField = true;
				}
				else if(!endField)
				{
          // if this is the second click
					gridPos = GridManager.instance.nodes[row,col].position;

					//don't overlap || not on the same row/column
					if((gridPos == startPosition)||(startCol!=col)&&(startRow!=row))
						return;

					startCol = 0; startRow = 0;
					endCell = indexCell;
          // create the star array which initates the game object
          // above every grid cooridnate along with a star
					CreateStarArray();
					starSequencer += 0.1f;
					StartCoroutine(CreateStar (gridPos,row,col));
					endField = true;
				}
			}
		}
	}
A bunch of functions operate together at the end of BaseCreator.cs for building the walls (fields). Here's a quick breakdown:
| Function | Description |
|---|---|
| CreateStarArray() | Creates a star for each of the grid coordinates in the field row |
| LateOnCreateFields() | a small 0.2 second wait before creating the field on each spot |
| OnCreateFields() | Runs the CreateFields() function |
| CreateFields() | for each of the objects in the array runs OnFieldBuild, DestroyStars, and CloseFields |
| OnFieldBuild() | Runs Verify() to check resources which returns constructionGreenlit boolean equal to true. If fine, runs OK () |
| Verify() | Check resources and conditions to build which returns constructionGreenlit boolean equal to true. See Shop Menu > Defense Walls for more information about this function. |
| OK() | Calls PlaceStructure() which places the gameobject structure on the grid cooridnate |
| DestroyStars() | Sets the stars to slowly fade away |
| CloseFields() | runs DestroyStars() and sets the isField, drawingFields, and buildingFields booleans to false. |
| DeactivateFootstep() | Waits 0.2 seconds before deactivating the FieldFootstep game objects. |
When done, you'll have a full row completed like seen below:
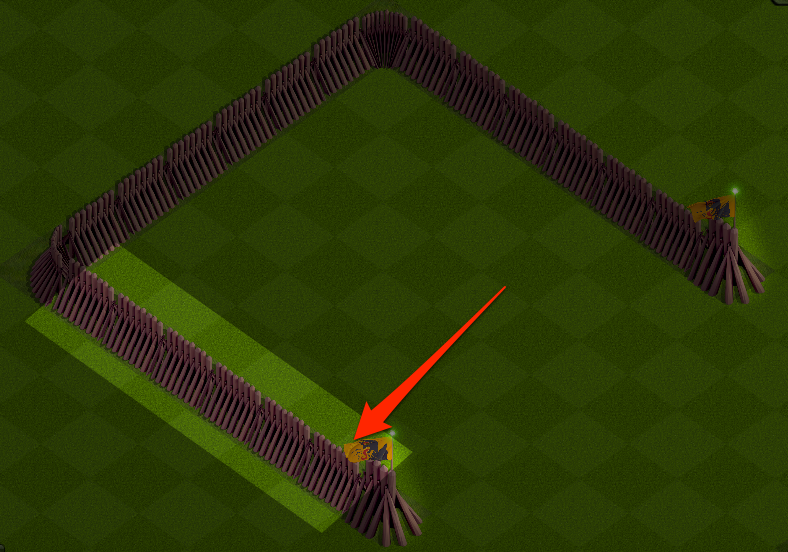
Finished row. Click to view larger.
Corners and towers
Corner and towers are built like normal structures - not using the field builder of the game engine but rather just placed like 1x1 grid size buildings on any available spot in the grid coordinates. Nothing special about these other than just custom game objects.
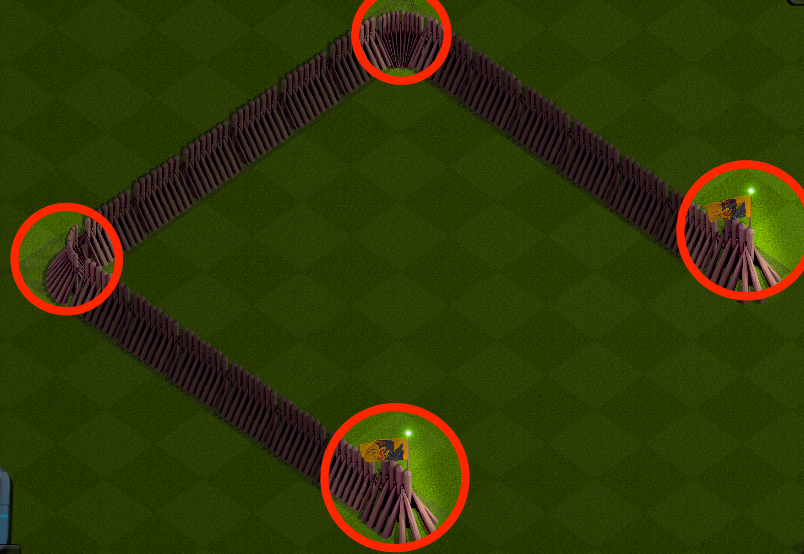
Examples of corners. Click to view larger.
Wall save data
Walls are saved under their own category called GridStruct in the SaveLoadMap.cs script as seen in the excerpt below. For more details about this data, you want to look at the About Map Files section of the documentation.
###StartofFile###
###PosStruct###
Weapon,Cannon,118,2,-384,362
Building,Barrel,119,3,-128,633.5
Building,Barrel,120,3,-768,181
###GridStruct###
WoodFence,WoodFenceNE,93,22,15
WoodFence,WoodFenceNE,94,22,16
WoodFence,WoodFenceNE,95,22,17
WoodFence,WoodFenceNE,96,22,18
WoodFence,WoodFenceNE,97,22,19
WoodFence,WoodFenceNE,98,22,20
WoodFence,WoodFenceNE,99,22,21
WoodFence,WoodFenceNE,100,22,22
WoodFence,WoodCornerS,101,17,14
WoodFence,WoodCornerW,102,22,14
WoodFence,WoodFenceNW,103,21,14
WoodFence,WoodFenceNW,104,20,14
WoodFence,WoodFenceNW,105,19,14
WoodFence,WoodFenceNW,106,18,14
WoodFence,WoodCornerN,107,22,23
WoodFence,WoodFenceNW,110,21,23
WoodFence,WoodFenceNW,111,20,23
WoodFence,WoodFenceNW,112,19,23
WoodFence,WoodFenceNW,113,18,23
WoodFence,WoodCornerE,115,17,23
WoodFence,WoodEndSW,116,17,22
WoodFence,WoodEndNE,117,17,15
###Construction###
###Removables###
TreeA,0,0,2,30
TreeA,4,0,3,7
###RemovableTimers###
###Numerics###
120,117,118
0.00,0
0,0,0,0,0,0,0,0,0,0
0,0,0,0,0,0,0,0,0,0
0,0,0,0,0,0,0,0,0,0
###Stats###
120,342,1,0,0,100,496400,499900,6696,500000,505000,7502,True,True,True,True,True
11/10/2016 9:35:58 PM
###EndofFile###
Pathfinding limitations
In the current kit, A*star pathfinding enemies go around walls rather than attacking walls. Pathfinding treats them as obstacles rather than structures.
So when testing, don't surround a base entirely with walls or else pathfinding errors may occur as units will not be able to reach buildings within.
// Scripts/Helios/Helios.cs
// Excerpt from FindNearestBuilding() function which
// locates structures to attack during battle

// ......

			// Limit attackable structures to game objects with structureClass
			// of Building or Weapon only
			if (allGrassPatches [i].GetComponent<GrassSelector> ().structureClass == "Building" ||
				allGrassPatches [i].GetComponent<GrassSelector> ().structureClass == "Weapon")
			{
				selectedGrassPatches.Add (allGrassPatches [i]);
			}
		}

// ......
Updated less than a minute ago
