Android
Android SDK Required
Follow the basic list of steps by Unity to setup your Android device first. And also follow these steps to download JDK and the Android command line tools
How to build your Android APK app
We recommend you follow the Unity documentation here:
https://unity3d.com/learn/tutorials/topics/mobile-touch/building-your-unity-game-android-device-testing although the following demonstration also works on older versions of Unity.
Get the Android SDK first
Are you encountering an issue regarding unity asking for the SDK root folder when building an Android app? Follow the list of steps to setup your Android device first.
We're running windows 7 and Mac. Here's a brief summary of how we fixed it on our Windows 7 computer.
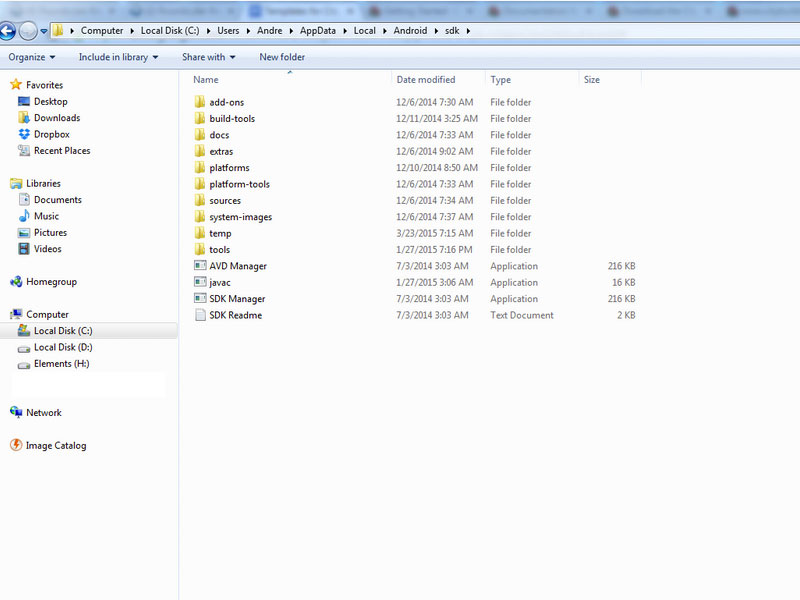
The SDK default folder is this:
C:\Users\DemoAccount123\AppData\Local\Android\sdk

SDK Folder. Click on image to view larger
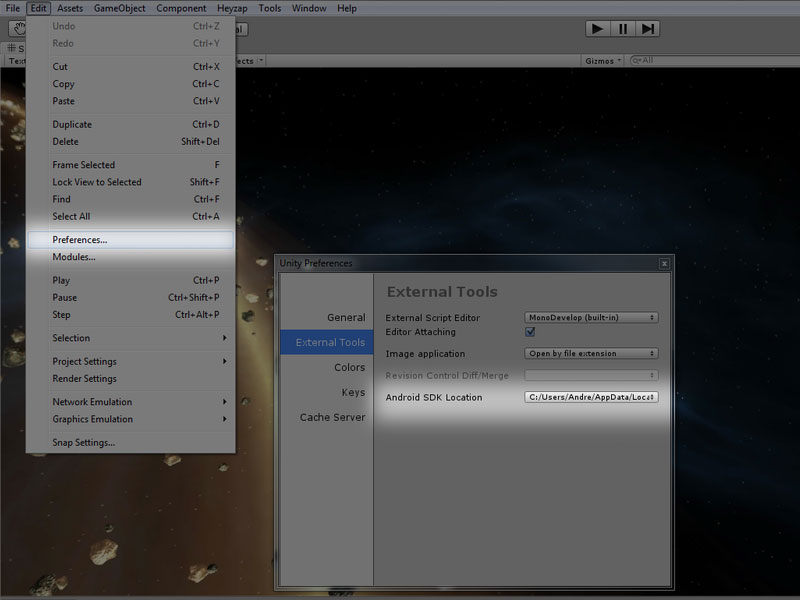
Make sure your unity has the correct SDK root folder path by modifying unity preferences:
Put in your android sdk folder path on this menu:
Unity -> Edit -> Preferences -> External tools

Edit > Preferences > External Tools. Click on image to view larger
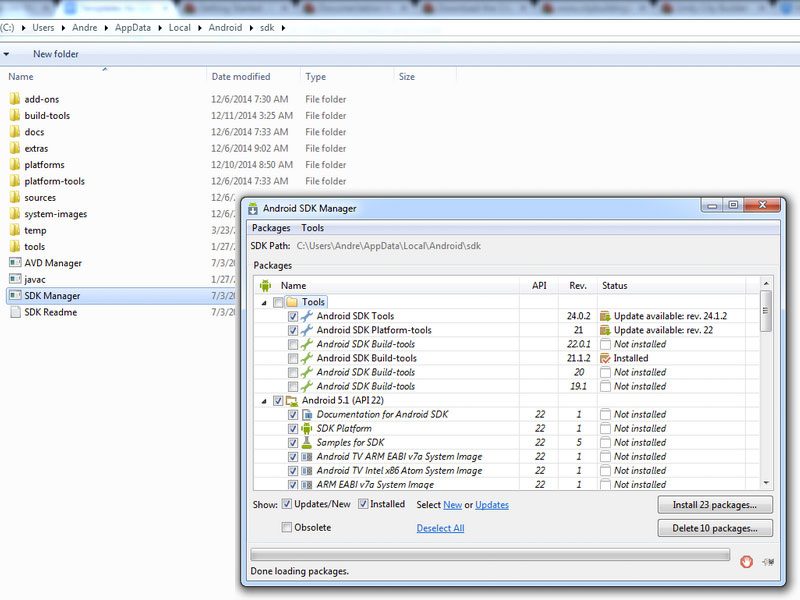
After checking that you have the correct path, go to that folder and you should see an executable called "Android SDK Manager". Run it.
Now make sure you have installed all the essential and latest packages.
Also, make sure you have the JDK installed. (If you haven't already)
After updating everything, try to build the .apk again.

Android SDK Manager. Click on image to view larger
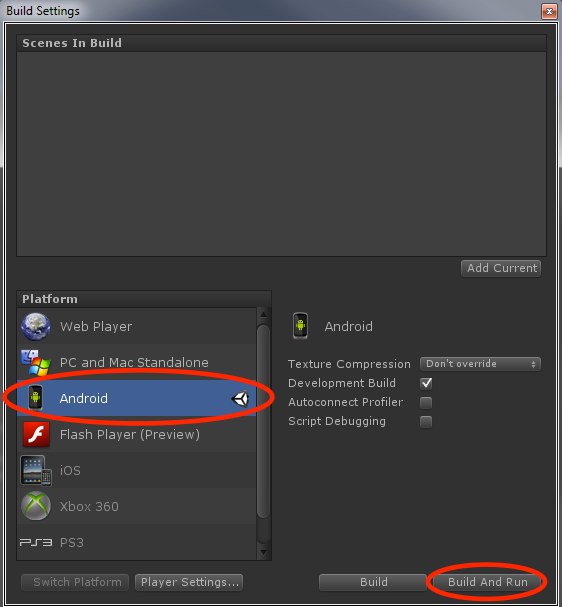
Next, build and run

Click on image to view larger
-
Open the Kit in Unity. If you haven't already, import NGUI in a new empty scene, not directly in the Game.unity scene (throws a few internal NGUI specific errors otherwise). Safer to apply this to importing 2D ToolKit as well.
-
Make sure you've downloaded JDK - Java development kit (download here) and the Android command line tools (download here, go to the very bottom of the page)
-
Connect your Android device to your computer. If you haven't already, check that the Android SDK is properly installed. (See how)
-
In Unity, click File > Build Settings
-
Click Android in the Platforms list, and then the Build and Run button.
-
Unity will build your game using the Android SDK and install on your device. The first time you build a project for Android, or if Unity later fails to locate the SDK, you will be asked to locate the folder where you installed the Android SDK. Select the root folder of the SDK installation. (Troubleshooting)
Watch: How to submit your Unity game to the Android App Store
Recommended App Marketplaces:
Comparison of app store performance
Exceeded the 100MB Google Play APK Upload Limit?
There is a limit for .apk files of 100MB. The complex method is using the "Split Application Binary" option, but it's possible the important parts of the game won't work when you split the application binary. Such as the IAP I have added, and the sound.
Alternatively you can save a few MBs by splitting the APK into two uploads. Google Play recommends uploading ARMv7 and x86 APKs separately in their Advanced mode.
In Unity, the default Android player settings include both ARMv7 and x86 support in the APK- with an empty project this gives an APK of ~14.4 Mb. If you build for only x86 or only ARM the APK is ~8.4 Mb (but if you exclude x86 your game won't run or will run poorly on the new generation of Intel Android devices, eg the Nexus Player).
The setting can be found under Edit->Project Settings->Player->(Android tab in Inspector)->Other Settings->Device Filter. You can often also shave off another ~1 Mb by increasing the Stripping level, if your game allows it.
Reduce the download size on Google Play using this, and use the option to upload multiple APKs targeted at CPU architectures so you can cover both ARM and x86.
Reference: http://developer.android.com/google/play/publishing/multiple-apks.html
Updated less than a minute ago
