Part 1: Create Prefabs
Reminder - Keep Daily Backups
When working on a strategy game with a kit as big as the Complete Kit - always keep a working daily backup! Save yourself the trouble of rolling-back changes and losing work.
Part 1: Create Prefabs Video Walkthrough
Watch this video or read the steps below for how to turn your building images into Prefabs to use in your game. This is the first part to customizing buildings. The next part is Part 2: Customizing menus using the sprite images and XML data.
Part 1: Create Prefabs Walkthrough
This is the first part to customizing buildings. Follow the steps below. The next step is Part 2: Customizing menus using the sprite images and XML data.
What about animated buildings?
If you would like to do animated buildings too, please follow the instructions on this page but also read the About Animated Buildings section of the documentation on the right.
1. Adding your own building images
It's as easy as a-b-c:
a. Go to the folder -> Sprites_TK2D.
b. Create a new folder, for example: BuildingsNew.
c. Add your own building images inside the new folder.
Size Range:
Width 170-300px
Height 150-390px
These sizes are rather large but buildings are usually very big graphics in contrast to other sprites so this range is a good guide. The background for these images are transparent.
Game Optimization Tip:
The sprite size of everything in our sample kit is lavish and large. We use very high quality images for all the free samples. If you want to do a production game using our free images and prefer to optimize your game size, scale down the sprite size for all the included graphics and minimize what files you use.
Restrict the size to each sprite (environment, buildings, characters) to, say, 128, and then display them scaled at 2 or 3. The smaller the images, they will look a little blurry. Use square images for everything - same height and width, in both 2dtoolkit and ngui - this will save you the trouble of resizing each to match the changing aspect ratio.
Pssst! Here's a TIP: Using similar image sizes will make things easier, but it's not mandatory - you can scale everything down, as long as the graphics quality remains reasonable on the target platform.
The existing images of the buildings used for the kit are inside -> Sprites_TK2D/Buildings, as the following image will show you:
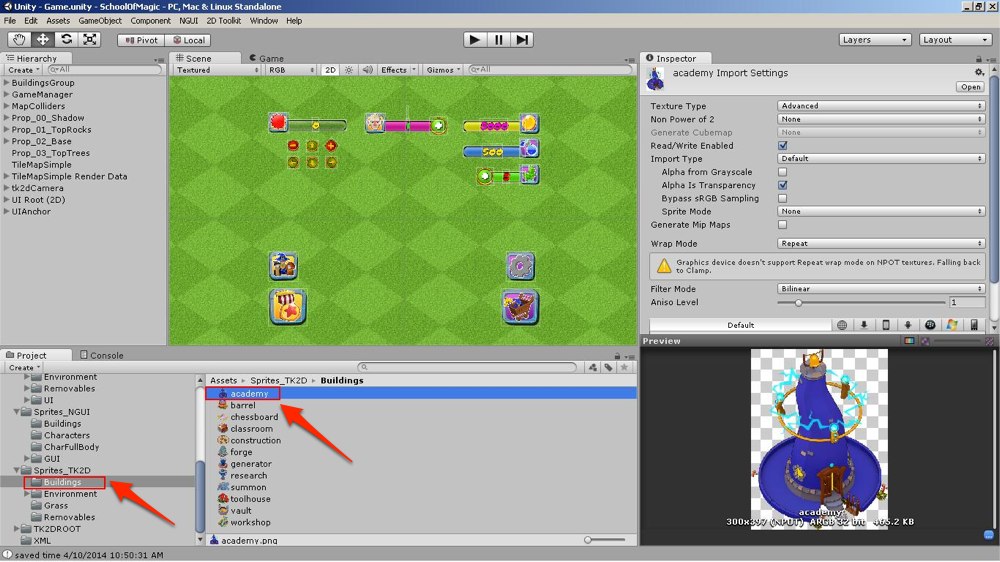
Click on image to view larger
2. Creating the Atlas(Sprite Collection) for your added images
a. Go to the folder SpriteCollections_TK2D & create a New folder, for example: BuildingsNew
//At the top of the project browser:
b. Select "Create">tk2d>Sprite Collection
//Refer to the following image:
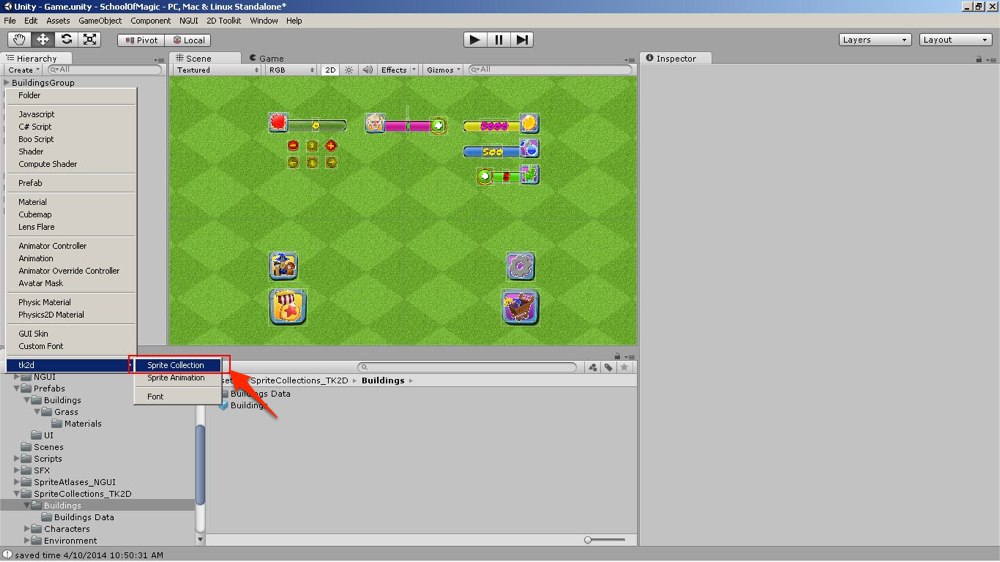
Click on image to view larger
c. Save it inside the SpriteCollections_TK2D>BuildingsNew folder you just created, as for example: BuildingsNewSpriteCol (which is the name of the Sprite Collection)
d. Now select the new sprite collection you just created and under the Inspector section, you will see a button called "Open Editor". Click it!
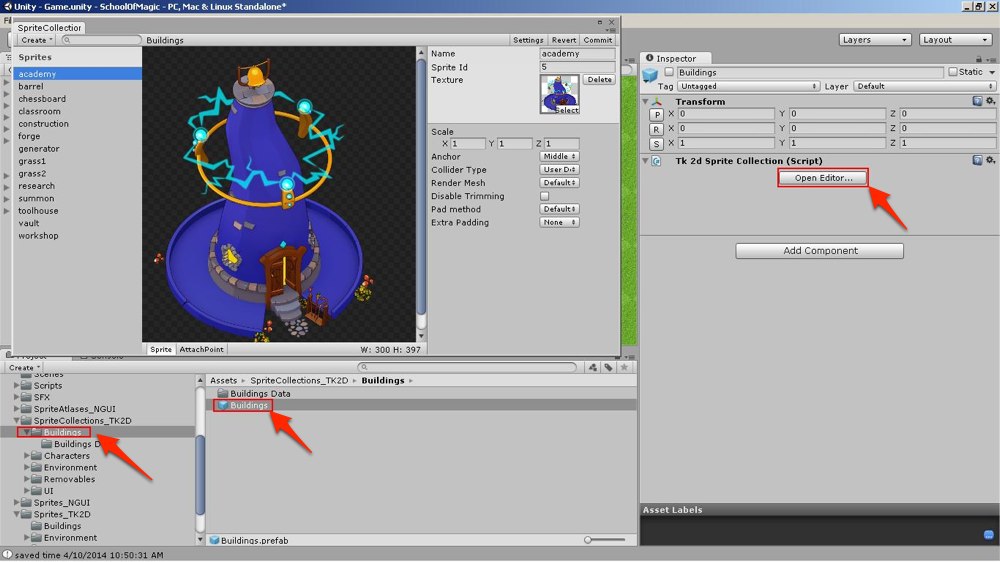
Click on image to view larger
e. Finally, keeping this editor open, navigate back to the folder where you added your building images(In Step 1), select them all and drag them in to the Sprite Collection Editor.
f. Hit the "Commit" button and you're good to go :) You've created your atlas!
//The "Commit" button is located at the top right corner of the editor window.
HINT: Want to see the sprite collection we're currently using for the kit?
- Go to SpriteCollections_TK2D/Buildings
- Select the Sprite Collection called Buildings and click "Open Editor" under the inspector window.
You may use collections like this available throughout the kit to analyze our prefabs and other components so delete them later(Perhaps when you're a pro at this!).
3. Creating each building's separate Prefab
Short Overview:
This step is going to be a bit long but if you do it once, it won't seem so big.
Prefabs are an easy way to instantiate gameobjects preset with scripts, textures, animations, etc. Useful for things like enemy generation or even buildings!
The best way to create a prefab for each building image you imported in Step 2 is to use one of our prefabs. Trust us, this makes life a lot simpler for you!
The idea is to drag in our prefab and change some specific things on the inspector window to turn it in to one of your own building prefabs.
You'll need to do this for each building sprite but again, it gets easier with practice.
Simply follow along:
a. Go to Prefabs/Buildings, Select a building, and drag it in to the scene.
//IMPORTANT NOTE: Drag in one of the STATIC buildings if you are trying to make a prefab for your static image. If you are attempting to place your animated building, we shall discuss this here For now, make sure you drag in a static prefab(Academy and Toolhouse are not static but animated)
For this example, we're using the barrel prefab, but any static prefab will do:
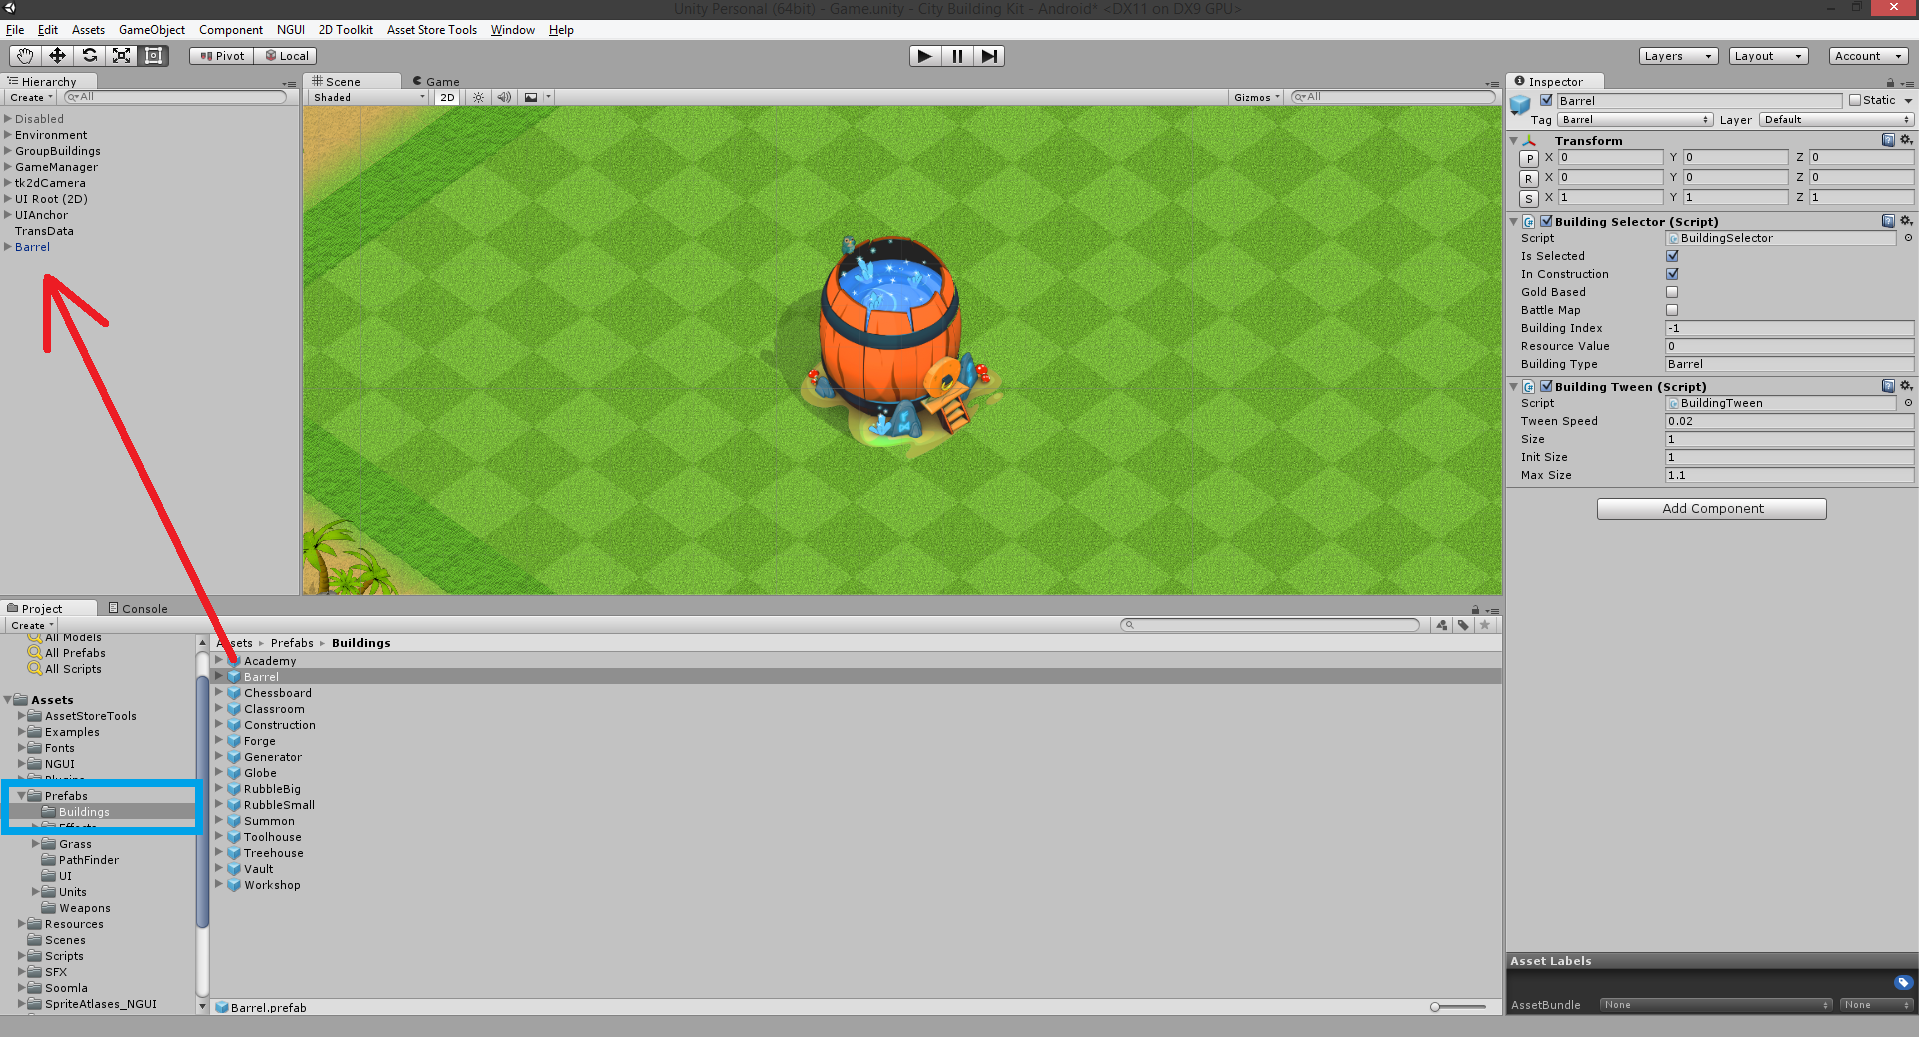
Click on image to view larger
It is a good idea to position the prefab at position (0, 0, 0) while setting up your own building prefab in order to make sure it falls properly on the underlying grid.
//We'll also show details in this step to adjust the button and sprite position properly.
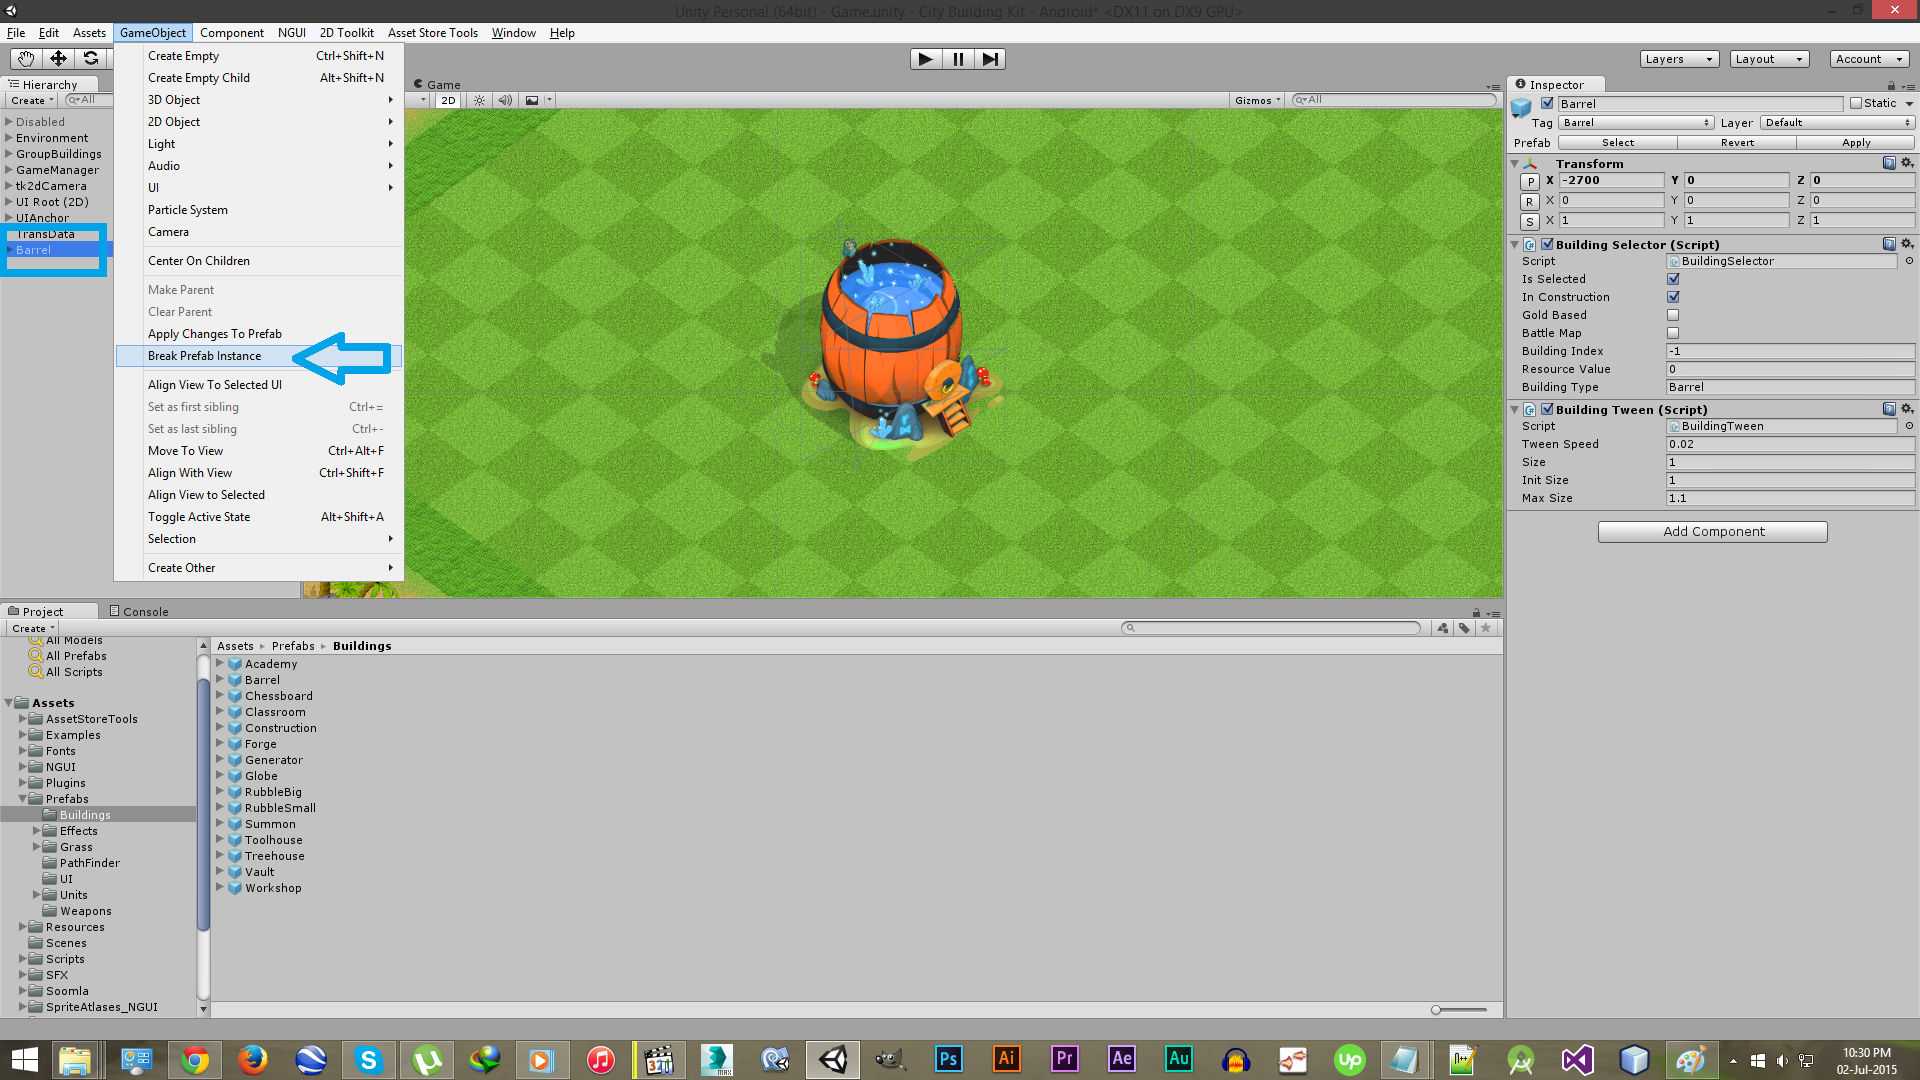
b. Select the prefab you just dragged in->Go to GameObject->Select Break Prefab Instance
//Breaks the instantiation to the kit prefab. Now it's ready to be turned in to your own!
//Image guide:
Click on image to view larger
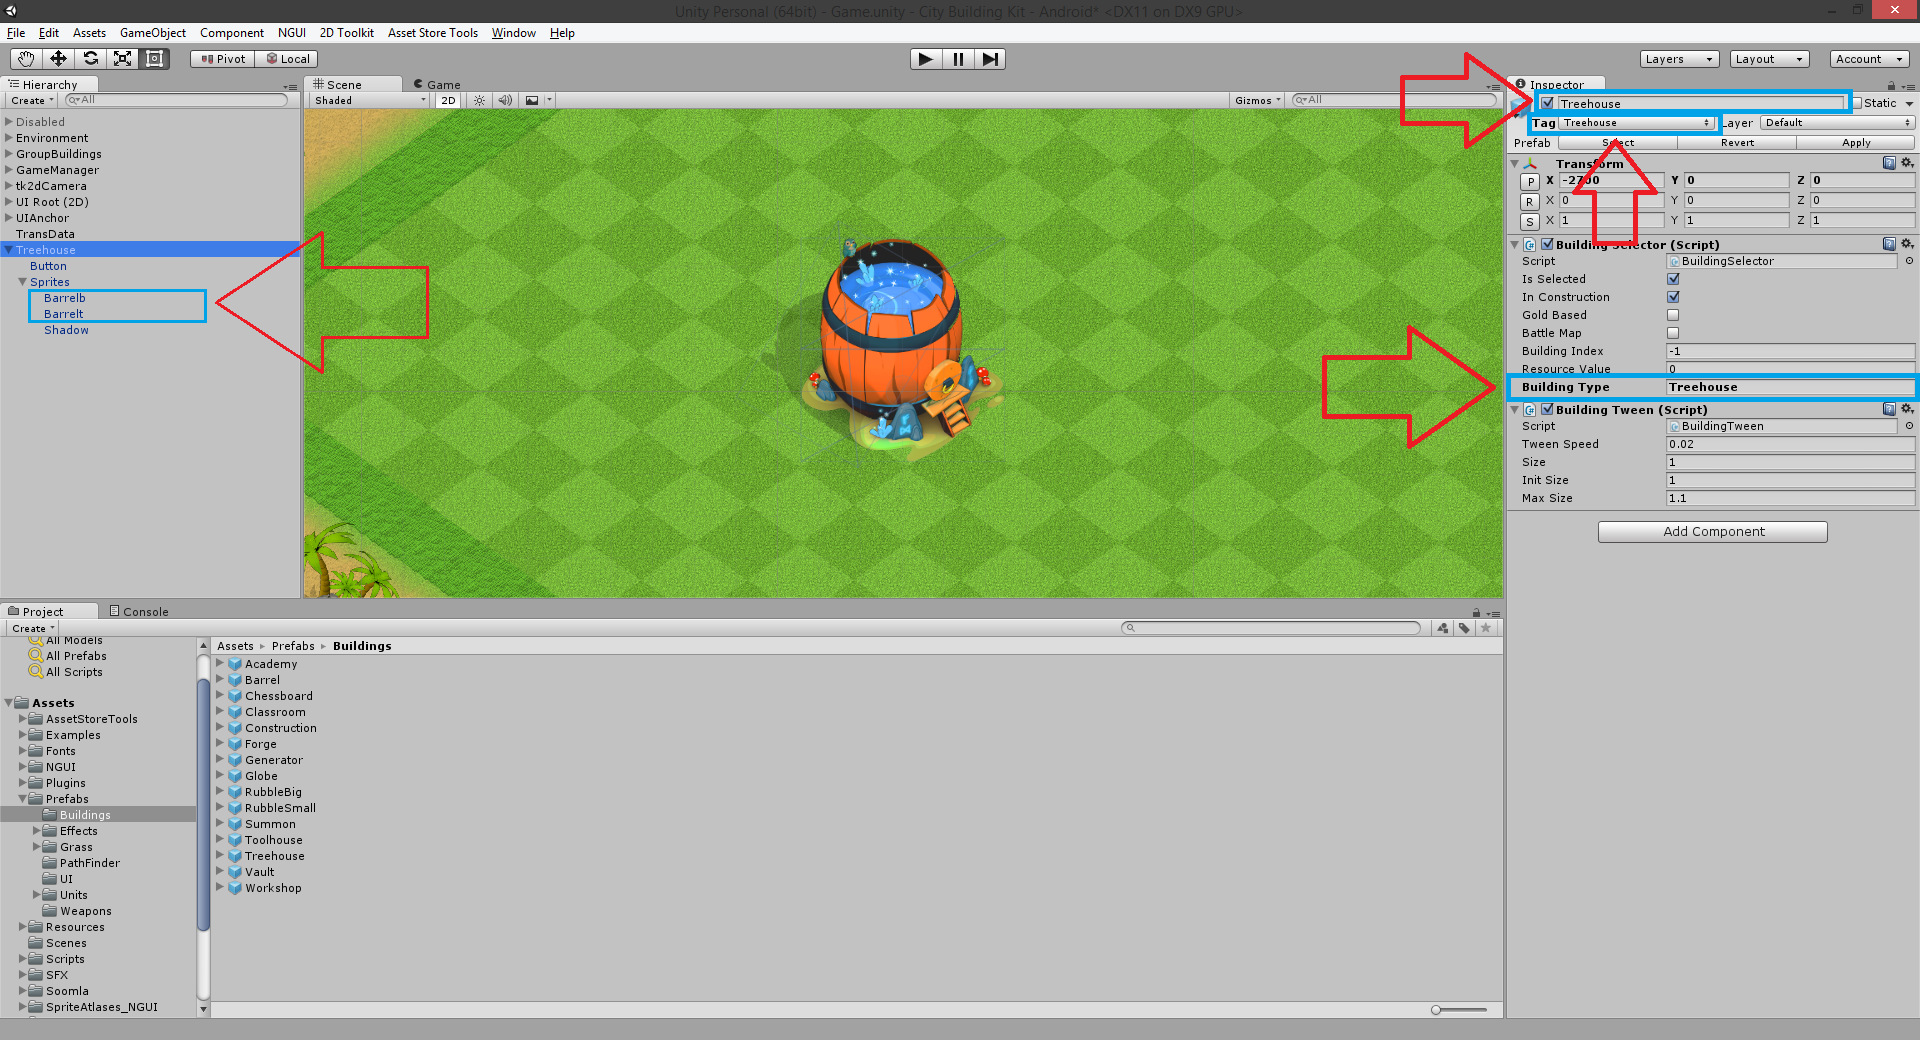
c. Change the following names just as the image below shows:
//In this example, we'll use the name Treehouse. It needs to be changed in all 5 of these places. For the Tag, create a new tag of the same name and just change it.
//Additionally in the child object "Sprites", you will change the children names from Barrelb and Barrelt to your own in the same format, for example: Treehouseb and Treehouset. Here b stands for bottom and t stands for top. They define the Cutoff Region for when the player is in the background(behind the building) and foreground(front of the building) so that they appear in proper layer/perspective. Leave "Shadow" as it is.
Click on image to view larger
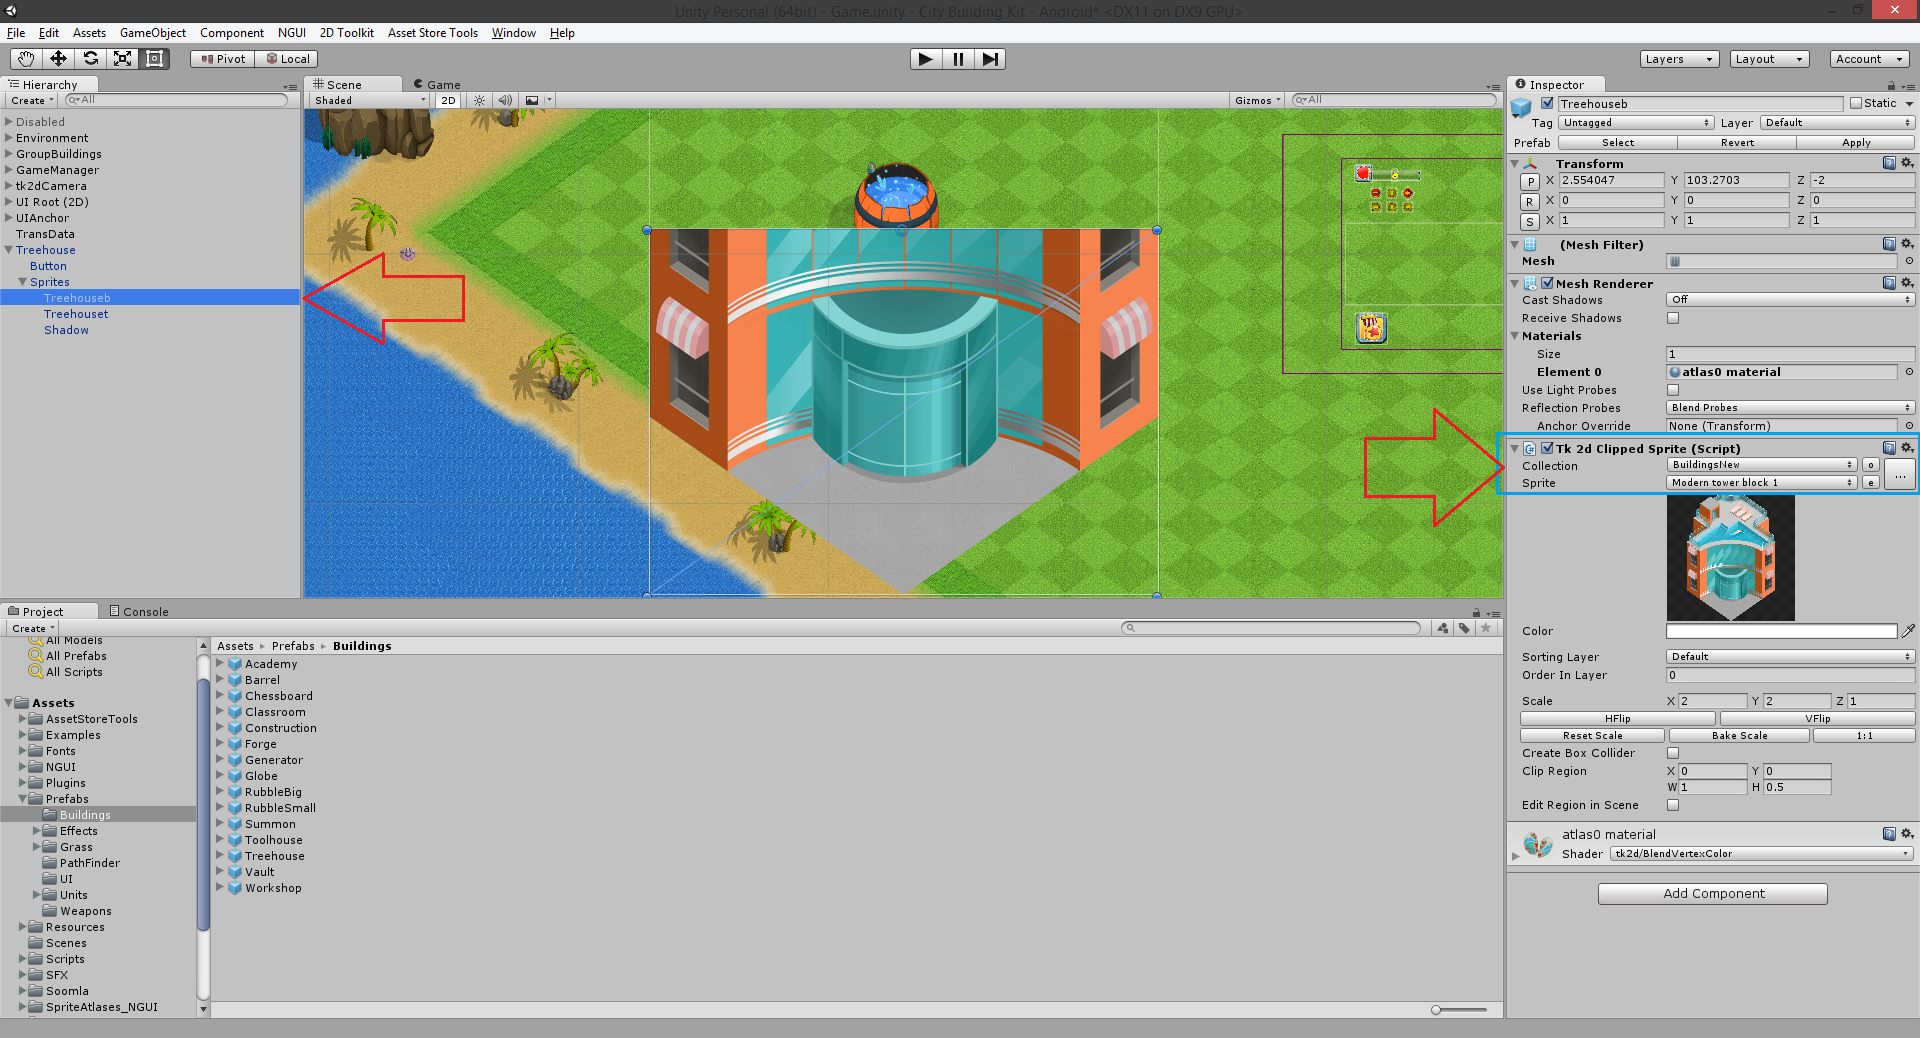
d. Now all that's left to do is to change the sprites in 3 places:
Treehouseb
Treehouset
Shadow
You will be updating these three with the same sprite of the building image you intend to use. The image will be changed through the Sprite Collection you created in Step 2.
Here's how:
Select the child object, we'll start with Treehouseb.
ALL you need to do is change the Collection under the Tk 2d Clipped Sprite Script in the inspector to the Sprite Collection you made in Step 2.
Then just beneath Collection, you may select the Sprite from your Atlas. This will show a list of all the images you dragged in to the collection/atlas in Step 2.
Repeat this for the other two child objects: Treehouset & Shadow
Refrain from touching any other settings as it will probably show errors. The entire prefab is preset so that it can be updated with a new building image. Though you may need to rotate/change x/y values of the shadow in order to make it appear properly cast off the building. Use one of the existing prefab shadow direction as guide to ensure all of your building's shadow are facing the same way. We don't want to have two suns now do we!
Click on image to view larger
In the image above, only the bottom half was changed so it looks weird. Here is one with all 3 child objects changed to the specific sprite from collections.
The shadow is automatic
Note: It's all automated, even the Shadow will be applied from the exact same sprite image using a little manipulation and black tint. All you need to do is follow the steps and just replace the sprites for all 3
Click on image to view larger
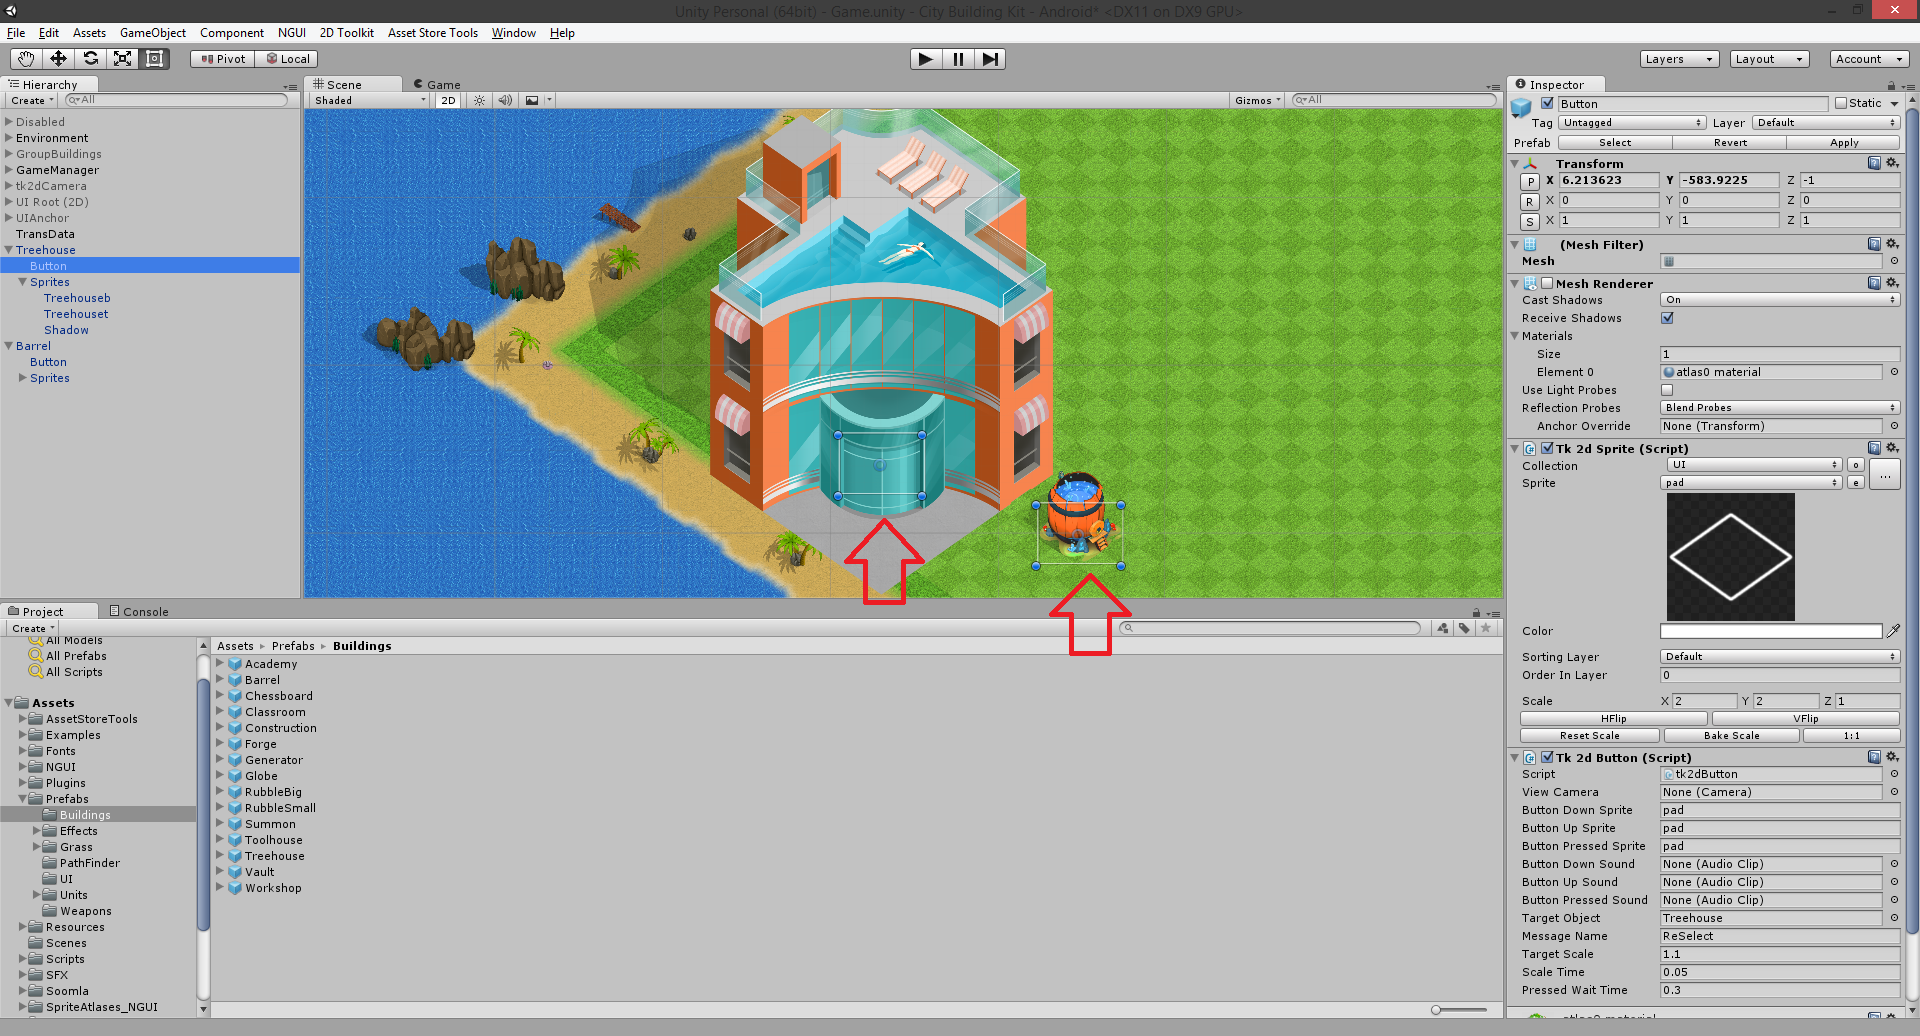
But you will notice in the above image, when I select the child object Button, the size of the new building image(which is gigantic in comparison to the tiny barrel) is far too big. Notice that on the barrel prefab, the button's rectangle just touches the outer corner edges.
This is quite important as this Button child is responsible for "Click/Tap" area for the players to select the building.
There is no need to change the size of your sprite image.
Simply resize the button's rectangle so that it just touches the corner edges, like so:
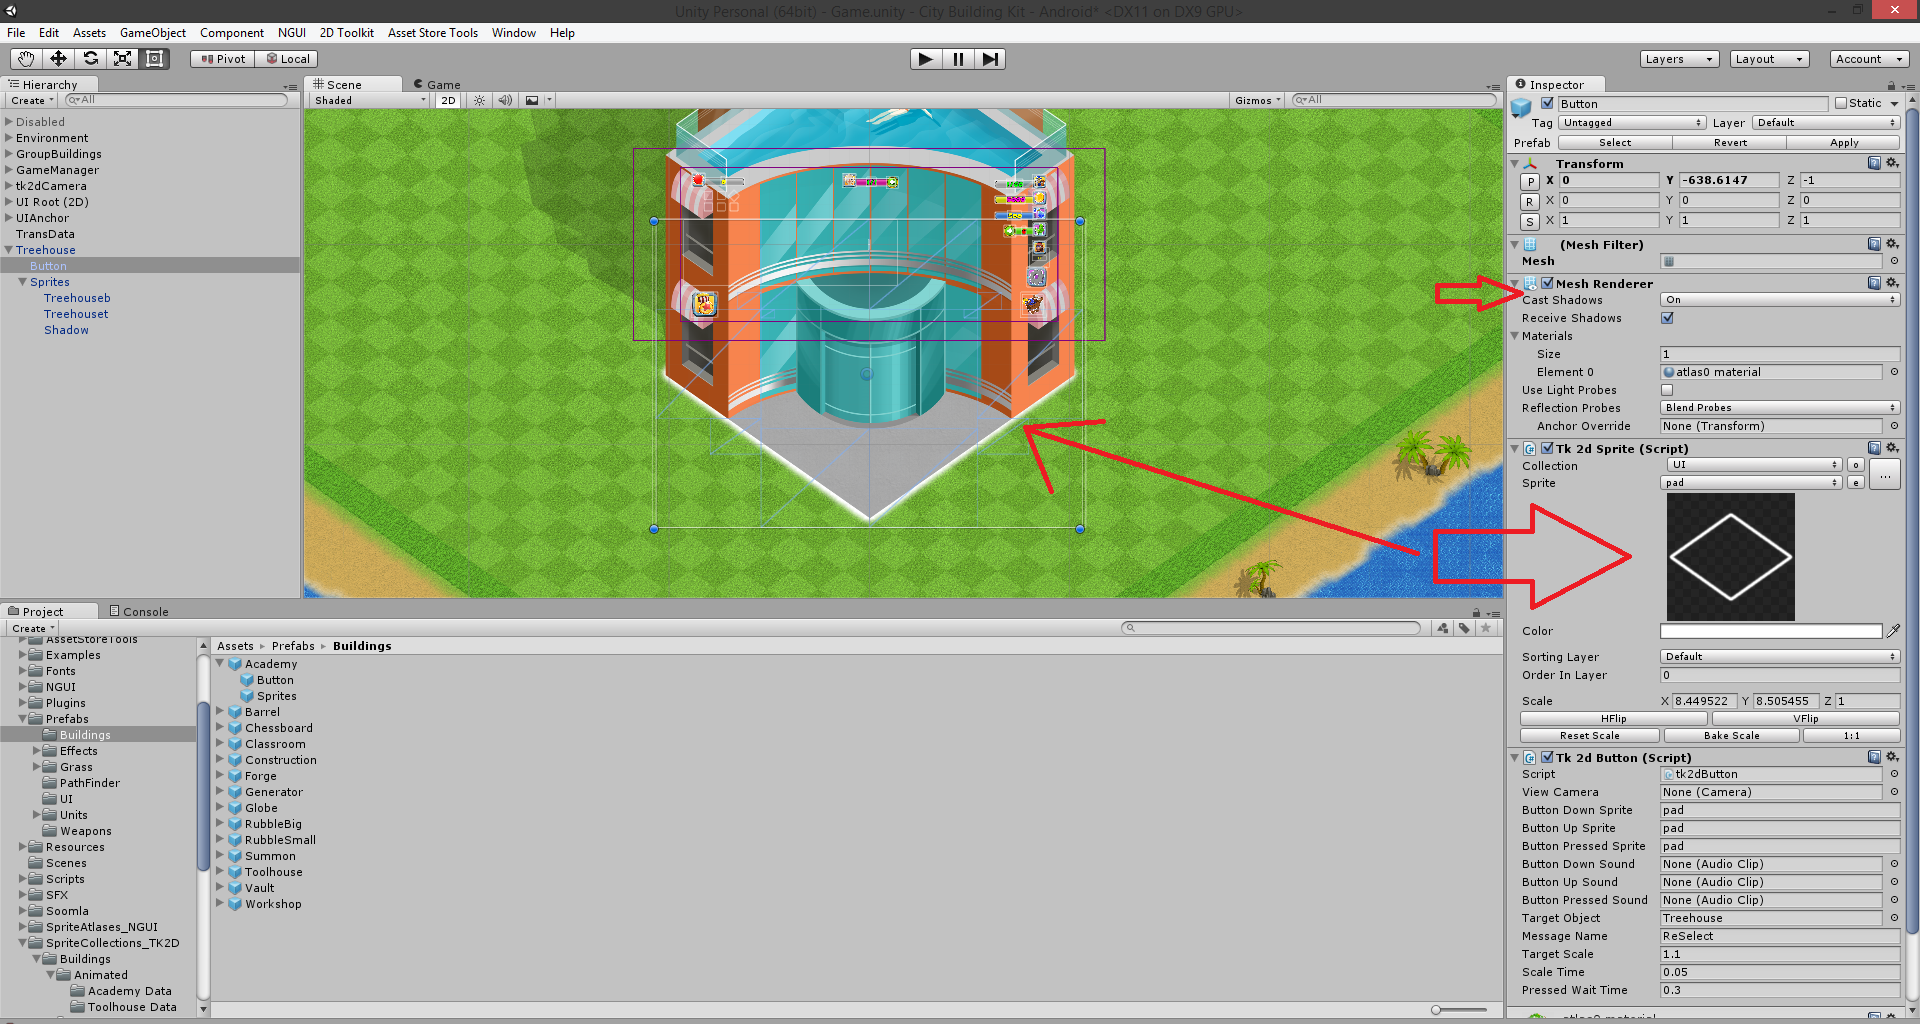
Click on image to view larger
Turn on the Mesh Renderer as shown on the Button gameobject and it will be visible on the Scene view. Then you want to align the corners of the button pad (the white bordered rectangle) in proper perspective to your building's base.
Once placed properly, turn off the Mesh Renderer for the Button gameobject.
Now the button area is properly optimized for the giant building!
One more thing to note is, here we used a building that's far too oversized and it's best to stick to the range provided in step 1 since the underlying grass prefab for the grid collision has a max dimension of 4x4 tiles. Lets assume the building is 4x4. For a building of this size, players may not appear properly in the background/foreground if the cutoff is not at the right region (which varies based on the size of the building).
Manually adjust this if the preset values do not work, check on the Edit Region in Scene box on either Treehouseb or Treehouset. Then adjust the rectangle of the cutoff region between the bottom and top half with respect to the height of the player characters imagining that they are standing on right or left corner of your image. This will be the accurate cutoff point for them to appear behind the building when in the background and in front of the building when in the foreground.
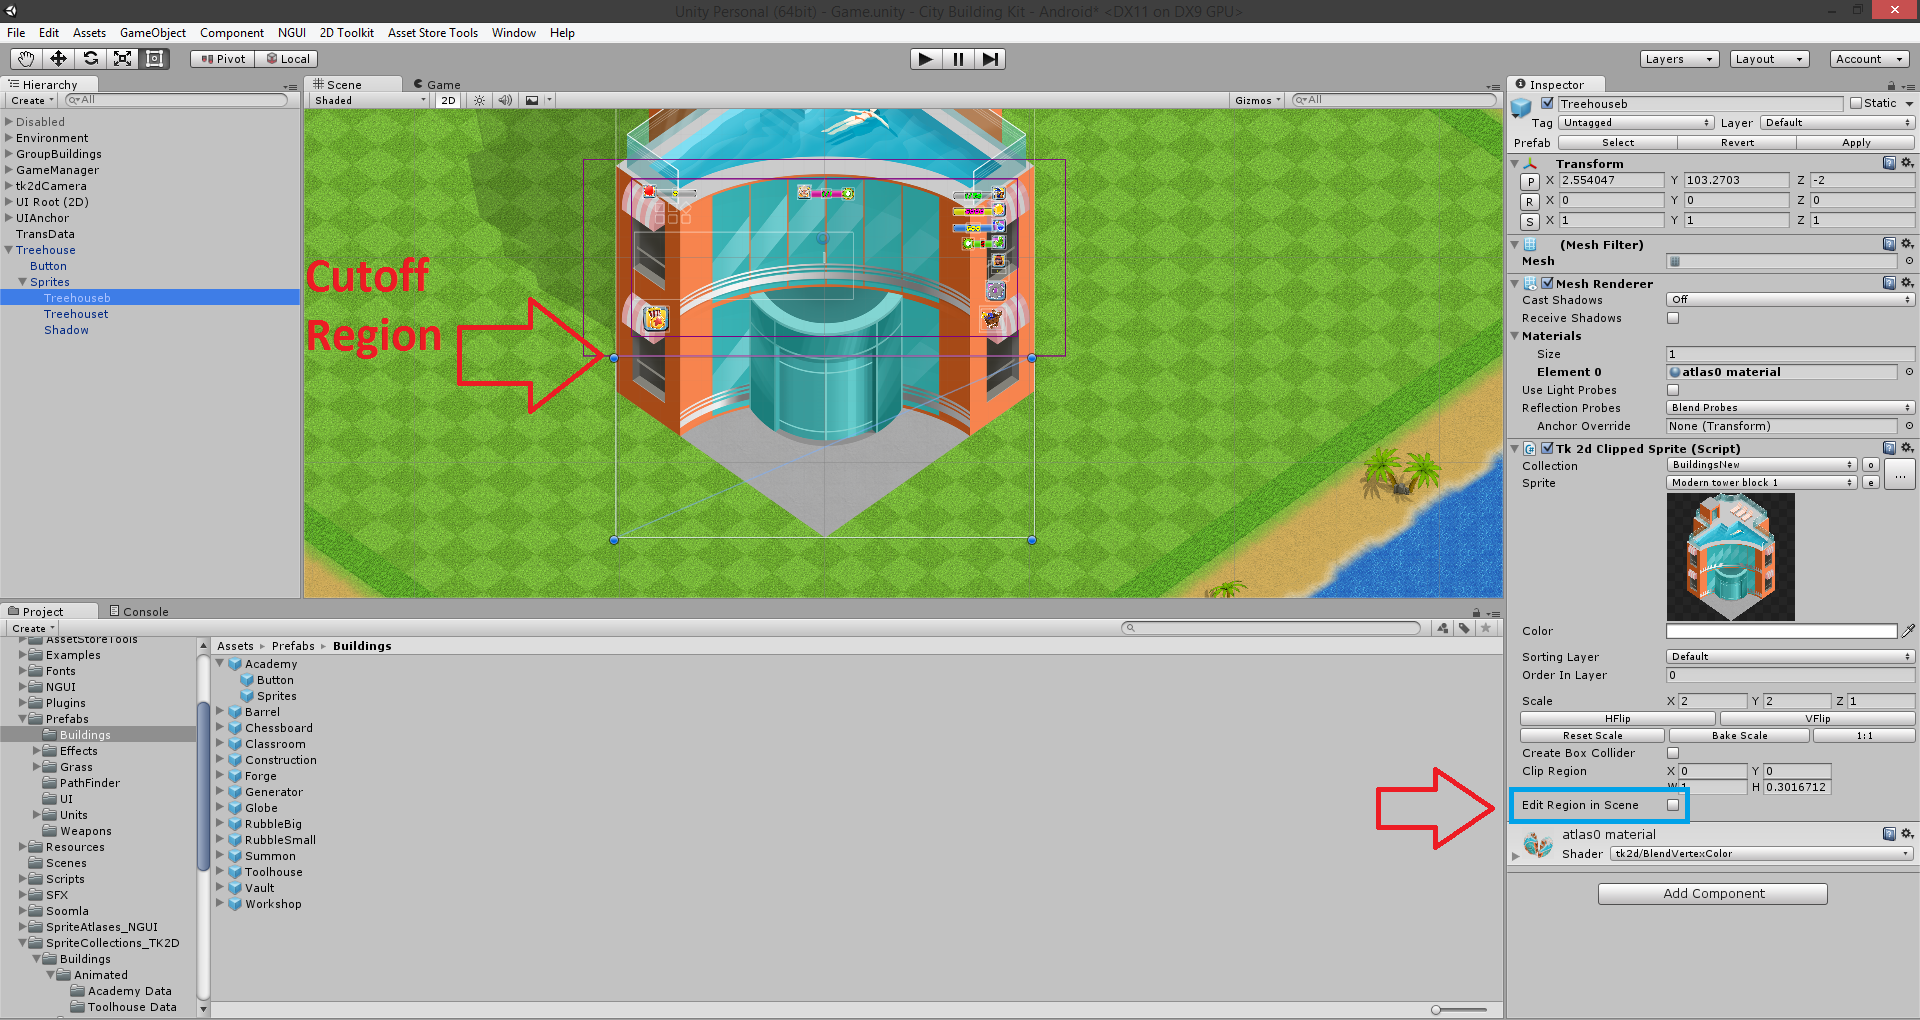
Click on image to view larger
Final Step: To turn the GameObject you just created back in to a Prefab to use for your game:
a. Go back to the folder Prefabs/Buildings
b. Right click>Go to Create>Select Prefab
c. Now just Drag & Drop the GameObject you just created in to the Prefab file and rename it. In our case it's Treehouse.
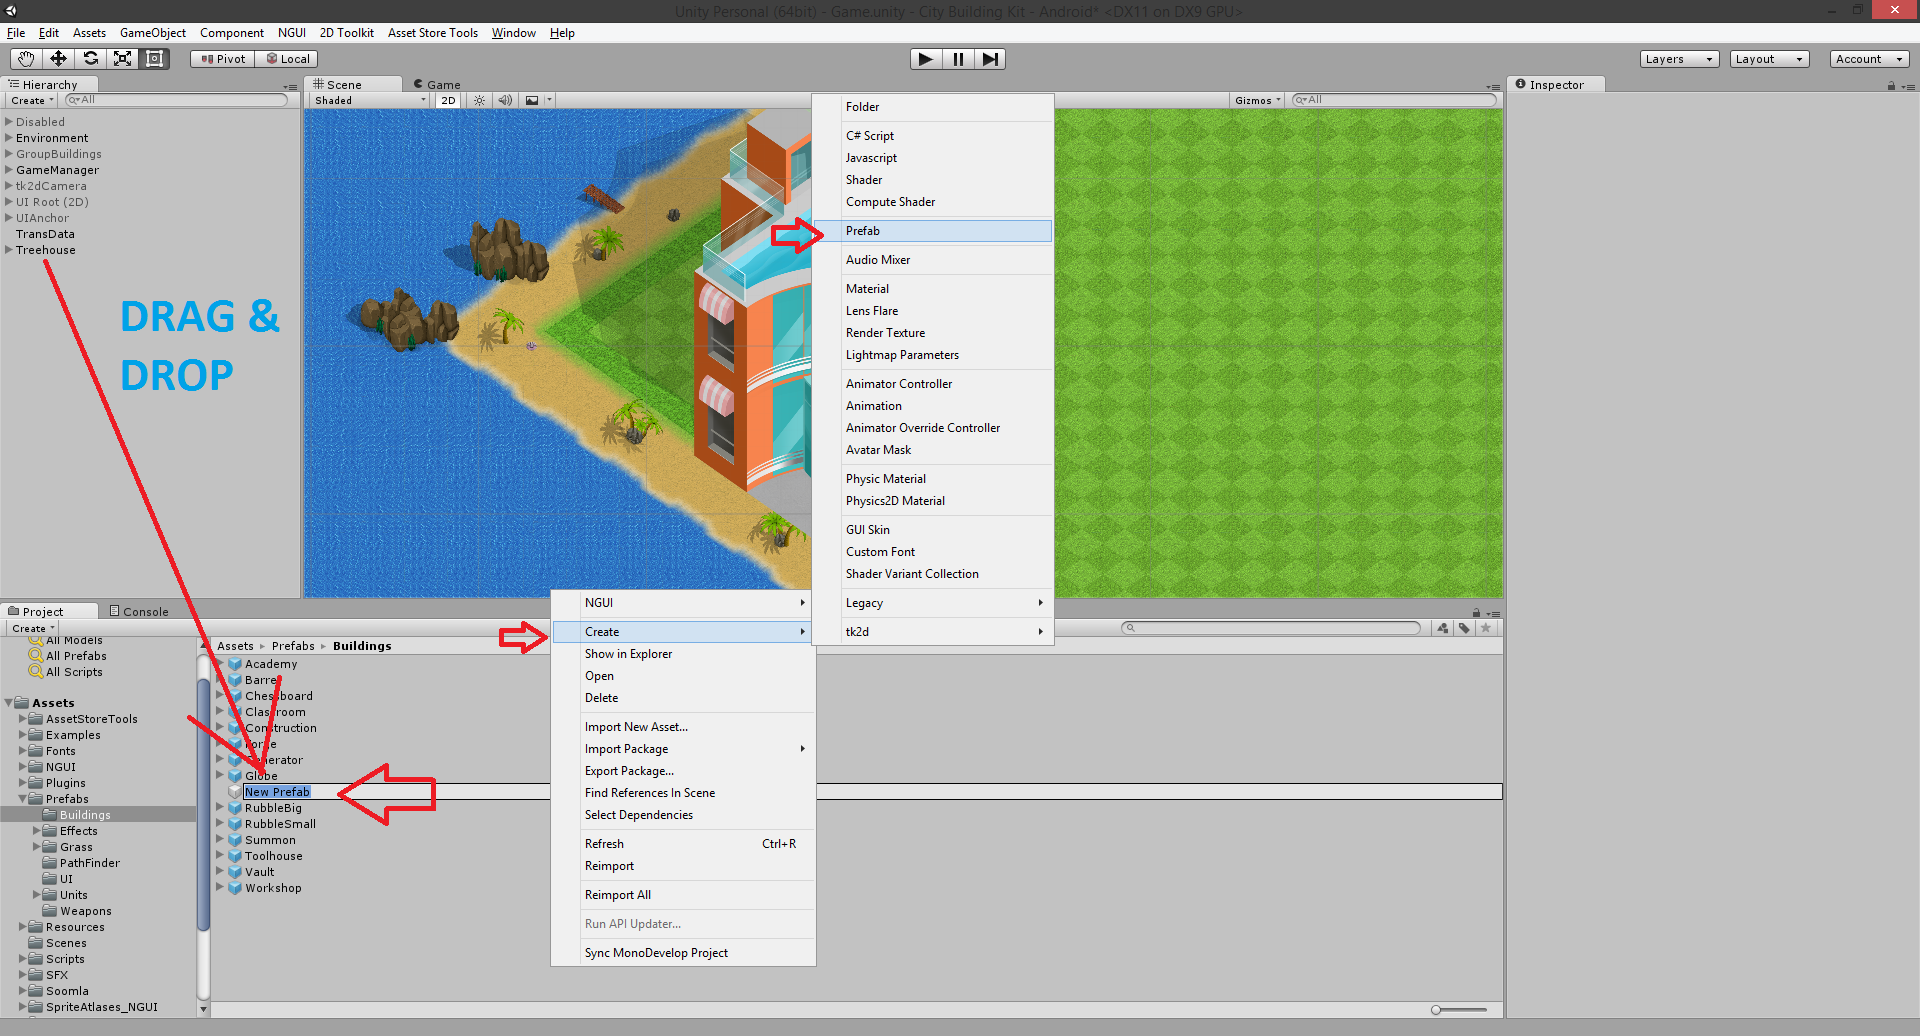
Click on image to view larger
Now you may drag this Prefab you just created from the Prefab folder in to any scene and your building will begin working immediately!
Reference: Each building has 4 components
Here's a small reference of some of the things discussed in Step 3:
| Compoment | Description |
|---|---|
| Nameb (Base clipped sprite) | the 2 clipped sprites will be on different z layers, to allow characters to appear in foreground/background of the building; a base collider will be necessary so they never step on the "edge" between the sprites |
| Namet- (Top clipped sprite) | see above |
| TK2D button | allows you to reselect the building |
| BaseCreator.cs | a script that holds variables |
Next, continue to Part 2
Next, read Part 2: Customize Menus to continue with the next steps in customizing the menus in the game with your new sprite and setting menu data with XML.
Want to learn more about sprites with 2D Toolkit?
To learn more about sprites with 2DTK, watch the video below or see the 2DTK documentation (for example this one on creating sprite collection)
Updated less than a minute ago
