Part 2: Customize Menus
Have you read Part 1: Create Prefabs yet?
Before you start on Part 2: You need to have your structure prefab ready. Click the link on the left side of the documentation under Buildings called Part 1: Create Prefabs to follow those steps.
Part 2: Customize Menus
Continuing from Part 1: Create Prefabs, we will now edit the game menus in Unity to customize the existing menu sprite images for the structure and fill the store menu with XML data. Part of this documentation will overlap with the documentation from the Store section.
The easiest way to get started understanding the kit is to customize the existing structures. So for this example we're going to replace the Dobbit Toolhouse sprite with the Schoolhouse sprite in the game menus.
3 Important Tips First...
Replace similar structures in the kit
For example, if you're doing a storage structure for resource #1, then replace the existing gold vault (storage structure) for resource #1 (gold). Ensure the storage structure prefab size is the same (design a storage structure that matches the object's existing grid size) and ensure that the XML object you replace is the exact same one as before. This is because the XML order, Prefab order, and game object names need to all match if you don't do any script changes.
Don't replace any random structure in the list unless you know what you're doing. If you switch prefabs for any random structure then strange performance or errors may occur for the script changes described in Part 3 that only advanced developers should do. Plus the XML order won't match the prefab order anymore and you'll have text for other structures appearing on the wrong prefab item in the store.
And
Adding new structures to your game?
First, read the tip above. We highly recommend you replace similar structures first to understand how the kit works. Spend a couple weeks playing with the source code first before attempting to add new structures beyond the existing examples. Most importantly, you'll need to be comfortable with the GameManager Inspectors and scripts.
Each new structure you add in one of the Inspectors must also be added in SaveLoadMap, SaveLoadBattle (Map01 scene).
Plus, you need to increment the arrays in the Creator Inspector like Grass Types (grid size grass colliders and grass prefabs to use), Construction Types (grid size construction prefab to use), Pivot Corrections (for odd/even grid size structures 1x1 and 3x3 / 2x2 and 4x4), Is Array (for field rows like walls rather than single structures), and Is Instant (for instant builds like the walls where XML TimeToBuild is set to zero)
And also, the XML order must match the exact same prefab order in these Creators.
Lastly, special coding changes are necessary as described in Part 3: Advanced Scripting Changes
And
Keep backups of the entire project
Before you edit structures - we recommend you make a backup copy of the entire project folder. This will help you revert to a previously working copy if something goes wrong in your changes.
1. Structure XML
All structure data is stored in the XML folder. It's one of the ways we keep data centralized and easy to edit. The following table breaks down which structure file has which elements
| Game Structure | Examples | XML source |
|---|---|---|
| Resource Structures | Gold Mine Forge, Gold Vault | XML/Buildings.xml (first 5 items) |
| Builder Hut Structure | Dobbit Toolhouse | XML/Buildings.xml (first item) |
| Military Structures | Tatami unit storage | XML/Buildings.xml (last 7 items) |
| Normal Structures | Wizard Academy or Classroom | XML/Buildings.xml (middle items) |
| Defense Structures | Cannon, archer tower | XML/Weapons.xml |
| Wall Structures | Wooden walls, stone walls | XML/Walls.xml |
| Ambient Decoration Structures | Flagpole, flowers, palm trees | XML/Ambient.xml |
| Removables (not a structure - look at the Terrain > Player Removable Objects docs) | TreeC, ClamA, ClamB | XML/Removables.xml |
Here's an excerpt from the XML/buildings.xml Dobbit toolhouse item with comments we've added next to each item:
<Building> <!-- 00 -->

	<Name>Dobbit Toolhouse</Name>
    <!--  name displayed in the store -->

	<StructureType>Toolhouse</StructureType>
  <!--  same as prefab, just a tag, that helps us load and save the game (the map is populated with the appropriate buildings). Also, it's a generic identifier (one fits all) for anything from buildings to weapons to decorations -->

	<Description>They live in the tiniest of houses, they don't talk much, and they're not much to look at. Yet, you'll never have enough of these guys. We'll make sure of that.</Description>
    <!--  description displayed in the store -->

	<Currency>Crystals</Currency>
    <!-- save as Gold, Mana, or Crystals to buy; production/storage building, buy with gold, produces mana -->
	<Price>25</Price>
  <!-- amount of resource necessary to pay for the building -->

	<ProdType>None</ProdType>
  <!-- resource produced - gold/mana/none-->
	<ProdPerHour>0</ProdPerHour>
  <!-- the amount of the resource generated per hour -->

	<StoreType>None</StoreType>
  <!-- None, Internal, Distributed-->
	<StoreResource>None</StoreResource>
  <!-- resource stored - None/Gold/Mana/Dual (gold+mana)/Soldiers-->
	<StoreCap>0</StoreCap>
  <!-- gold/mana/dual/soldiers storage -->

	<TimeToBuild>5</TimeToBuild>
  <!-- the time (in minutes) needed to create the building -->
	<Life>200</Life>
  <!-- life vs damage -->
	<XpAward>100</XpAward>
  <!-- experience awarded for the completion of an object -->

</Building>
All of the store details seen in the below screenshot are taken from the XML/Buildings.xml file and loaded by Scripts/Creators/BaseCreator.cs to fill in the store data. Here's an excerpt of the Gold Vault building taken from the XML/buildings.xml
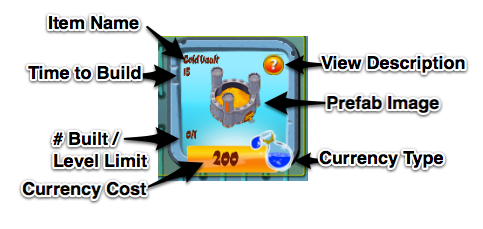
Sample store item. Click to view larger.
To update the store text to your structure, it's as easy as adjusting the text in the XML file like the title or the price.
Learn about the XML...
For more complex changes, like changing the type of structure storage or resource generation and learn more about specific XML items above - please read the Shop Menu category of documentation pages which go further in depth into the XML and the shop menu.
For this page's example of customizing your structures in the game menus, we're going to leave the item name, description, and settings the same as the original dobbit toolhouse and only replace the prefab in the next step.
2. Shop Structure Graphic
To start, look in the screenshot below, the Dobbit Toolhouse building:
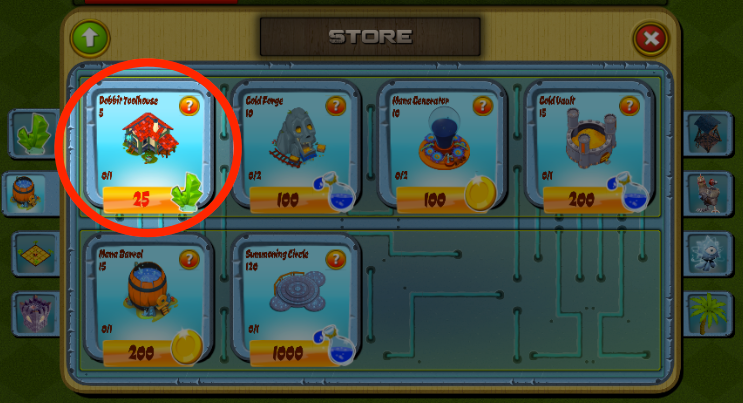
Dobbit toolhouse item in the store. Click to view larger.
In the Game scene UIAnchors, open Anchor - Center. This contains the game menus. Inside you want to open the Shop > Main item. This is the main shop menu, each tab of the shop is organized here. For this example we'll be replacing the dobbit toolhouse structure, which is on the production tab in the store. So open the ScrollViewProduction.
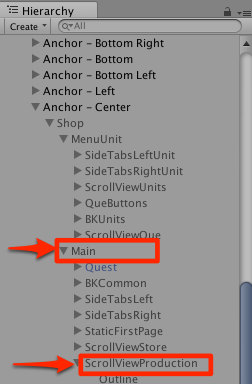
ScrollViewProduction. Click to view larger.
Inside ScrollViewProduction open SVProduction. There are two rows for structures in the shop, Dobbit Toolhouse is on the top row so open UI_GridUp (the top grid).
Inside you'll easily recognize the toolhouse item we named 00u_Toolhouse. Each of the shop elements follow the same structure once you're here.
Open Main and then you'll see 01Portrait. This is the portrait image of the structure in the shop. This is what we'll change. Select 01Portrait and look at the item's Inspector. (If you don't have the Inspector menu open -- open it now)
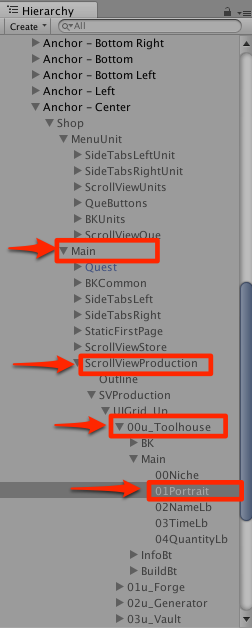
Select 01Portrait. Click to view larger.
| Hierarchy Element | Description |
|---|---|
| ScrollViewStore | In-App Purchase menu for gems and filling resources |
| ScrollViewProduction | Resource generators |
| ScrollViewMilitary | All other structure types - Military structures and normal structures |
| ScrollViewFort | Walls |
| ScrollViewDefense | Defensive weapons |
| ScrollViewCloak | Shield cloak. Currently purely cosmetic for developers that want this game feature. We don't use scripting for this yet. |
| ScrollViewAmbient | Ambient decorations |
| MenuUnit > ScrollViewUnits | For Units, you should be reading the units documentation page. But for your reference, this is under Shop > MenuUnit > ScrollView Units |
Note: Each of the shop elements follow the same structure once you're here. If you wanted to work with other shop menu structures, you would open the other items, like military structures in the ScrollViewMilitary item.
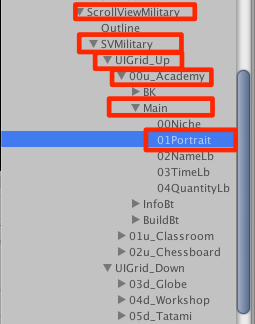
ScrollViewMilitary. Click to view larger.
Inside the Inspector for 01Portrait, click "Sprite" to open up the Select a Sprite 2DTK menu. From this list you can pick the structure image you would like to use. In this example, we're just going to pick one of the existing structure sprites we've already added to the kit -- the schoolhouse.
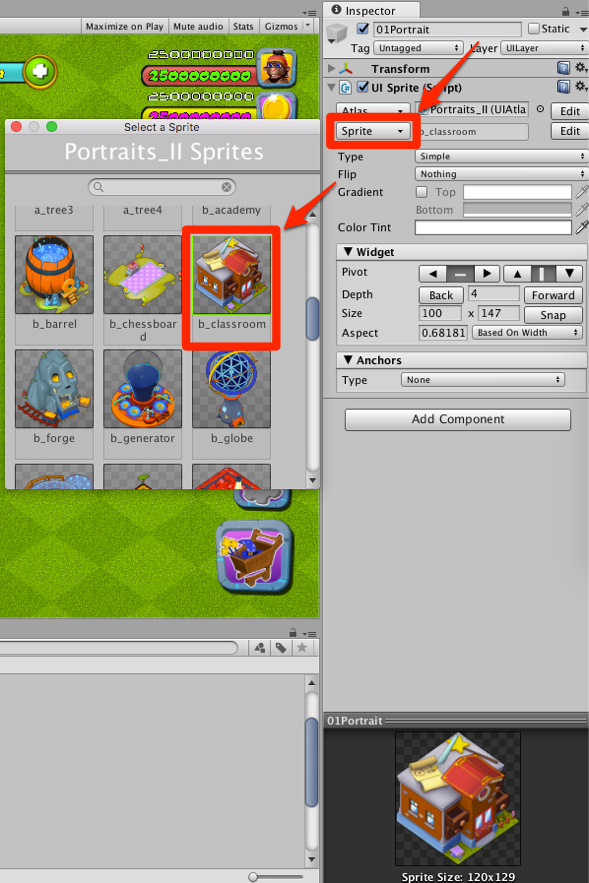
Select a Sprite. Click to view larger.
Once the sprite is selected - the image in the store has been updated. Play the game scene and open the Store > Resources panel. You'll see the updated prefab.
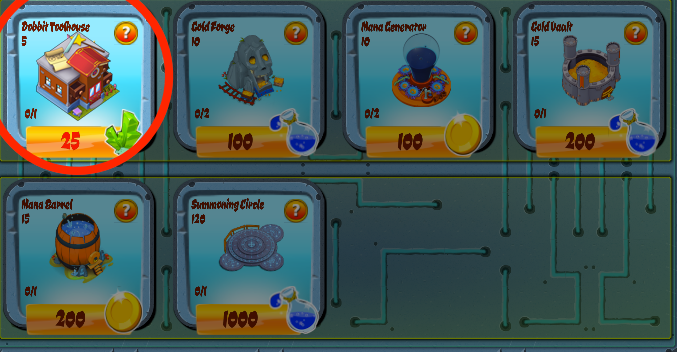
Click to view larger.
3. Update Structure Prefab
Once you've updated the structure sprite in the store - there's a couple more places we need to adjust in the kit so that structures in your home base use the new prefab.
- For Resource Structure: Open the GameManager > Creators > BuildingCreator Inspector
- For Military Structure: Open the GameManager > Creators > BuildingCreator Inspector
- For Walls: Open the GameManager > Creators > WallCreator Inspector
- For Defense Weapons: Open the GameManager > Creators > WeaponCreator Inspector
- For Ambient Decorations: Open the GameManager > Creators > AmbientCreator Inspector
The below screenshots are from the BuildingCreator, but the other Creators use the same organization. This is the prefab the building creator uses when placing the structure from the store onto the map.
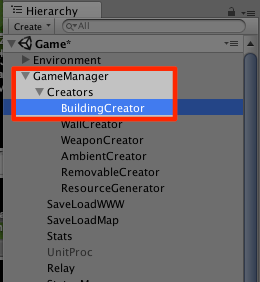
Click to view larger.
In the BuildingCreator Inspector, you'll see an array that matches the same list in the XML/buildings.xml. Since we're replacing the Dobbit toolhouse prefab, that's the first item in the XML and the first element in this Structure Pf array (Pf stands for prefab).
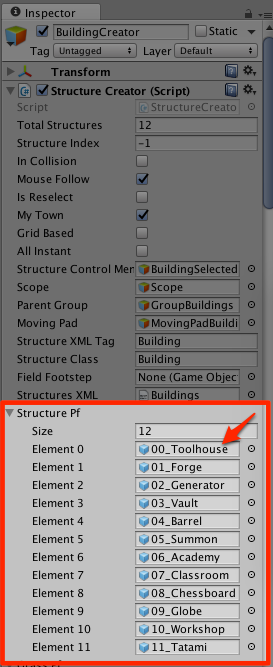
Click to view larger.
Select the 00_Toolhouse prefab in the array. A Select GameObject window will open. Select a different prefab in this window. In this case we're using the 07_Classroom prefab already included in the kit, so we'll select that one.
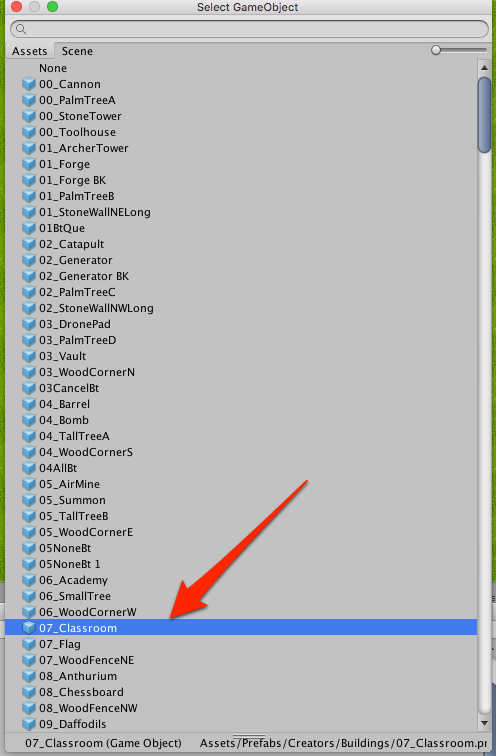
Click to view larger.
Now that we've selected the 07_Classroom prefab, the Element 0 item in the Structure Pf array will show the prefab we've selected.
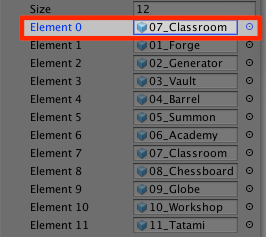
Click to view larger.
Also - if you need to change any special qualities about your structure like the grass prefab size, construction prefab size, pivot corrections, or change to an array field builder - you'll need to edit the corresponding Creator Inspector variables below.
Please make a backup first of your entire kit project!
We cannot stress this enough. As you work with a kit as big as this one, you'll revert to previous copies at least once. Regular backups save your work! It makes reverting changes easy if you make regular backups.
And spend a few weeks to understand the kit and how these settings work in the BaseCreator.cs script before you change the preset values. We highly recommend that you replace similar structures with the same special settings rather than try changing these values without understanding what or how they work in the scripts like BaseCreator.cs script among others.
| Inspector Array Item | Description |
|---|---|
| Grass Types | Grid size grass colliders and grass prefabs to use |
| Construction Types | Grid size construction prefab to use |
| Pivot Corrections | For odd/even grid size structures. Odd grid sizes like 1x1 or 3x3 need Pivot Correction set to true. |
| Is Array | For repeating field rows like walls set to true rather than single structures which is defaulted at false. Used by Verify() in BaseCreator.cs to choose the right Placement actions. |
| Is Instant | For instant builds like the walls where XML TimeToBuild is set to zero. Used by BaseCreator.cs to choose the right Placement function. |
Move onto the GameManager > SaveLoadMap
Next, go to Game scene GameManager > SaveLoadMap. We need to repeat the same step but for the process that saves and loads the map.
This is important because so far the sprite will show in the store, and when we place the structure in our village the correct structure prefab will show. But if we save the game and load it later, the prefab will still show the old 00_Toolhouse.
Select GameManager > SaveLoadMap and open the Inspector.
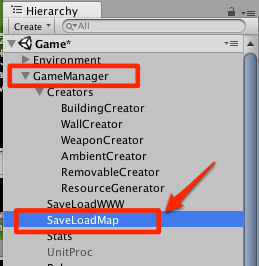
Click to view larger.
In the SaveLoadMap inspector, locate Building Prefabs array as seen in the below image) and repeat the same actions you did before...
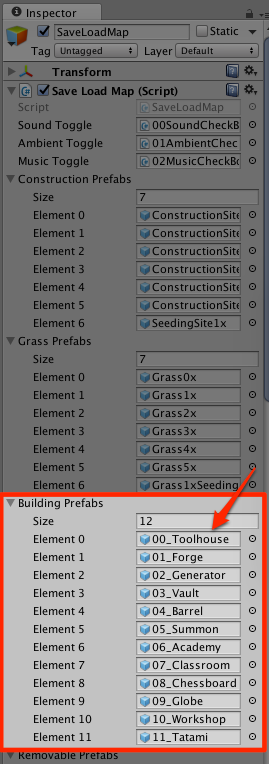
Click to view larger.
Select the prefab we want to use, 07_Classroom in the Select GameObject popup.
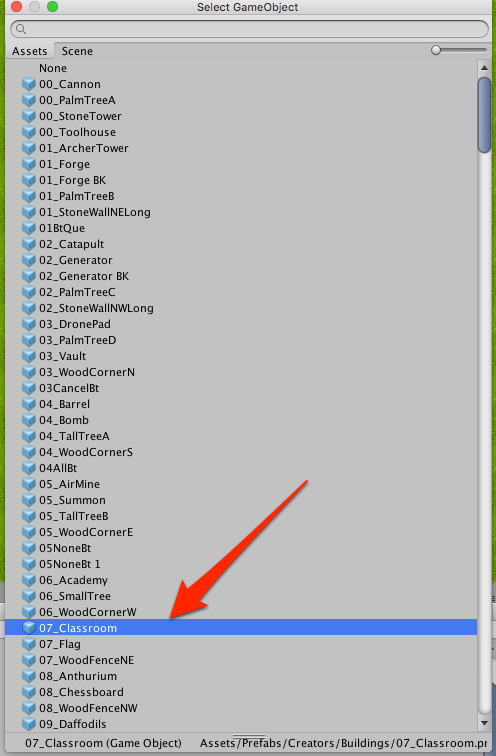
Click to view larger.
And the Building Prefabs array will have the Element 0 item updated again with the new prefab we want to use. Now when you save and load the map - it'll use the correct prefab.
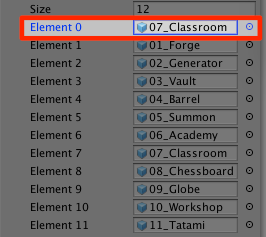
Click to view larger.
Now run the scene in Unity. Go to the shop > IAP tab, click the 500 crystal pack to load up on crystal first. Then click the resources tab and buy the Dobbit toolhouse. You'll notice the prefab that appears in the game is now the prefab we've customized.
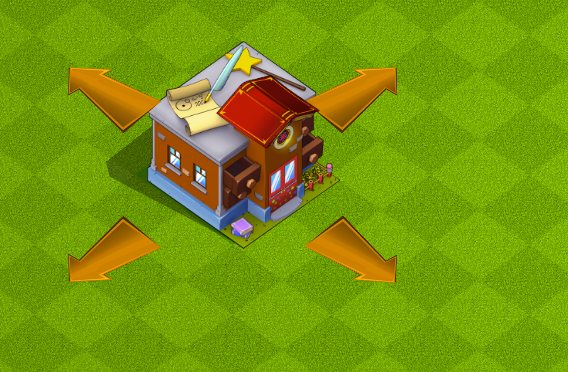
That's all the changes for the menus in the home base, the last step on this page is to repeat the same for the Map01 battle scene.
4. Update Battle Map Prefab
One last step to have the prefab replaced in the battles too so when we load that game object the correct one shows. First, open the Map01 scene.
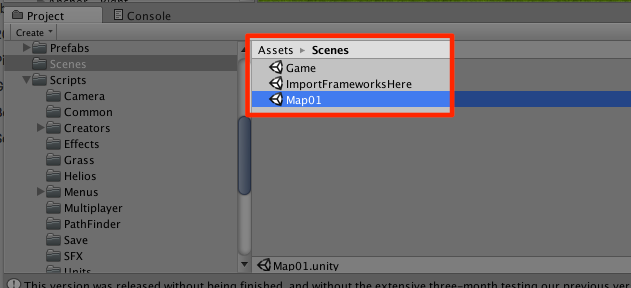
Click to view larger.
In the Map01 scene GameManager, select SaveLoadBattle.
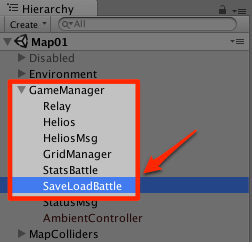
Click to view larger
In the SaveLoadBattle Inspector, once again select the Element 0 item in the Buildings Prefabs array.
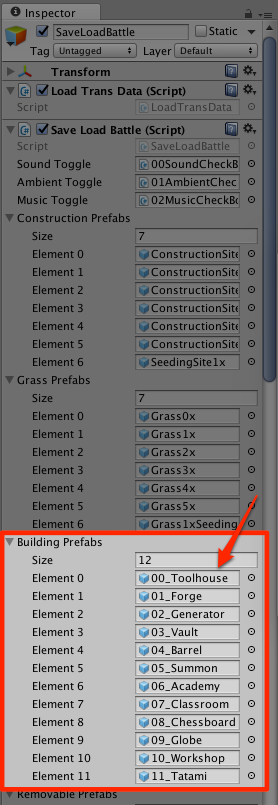
Click to view larger
Where does my structure belong in this Inspector? Look at the following table for a list of the different structure types and which array they belong to in the SaveLoadBattle Inspector.
| Inspector Array | Description |
|---|---|
| Construction Prefabs | Under construction prefabs |
| Grass Prefabs | Grass dark green square collider prefabs |
| Building Prefabs | All your buildings |
| Removable Prefabs | Player removable objects on the terrain (TreeA, ClamB, etc.) |
| Wall Prefabs | Stone wall prefabs |
| Fence Prefabs | Wooden wall prefabs |
| Weapon Prefabs | Defense structure prefabs |
| Ambient Prefabs | Ambient decoration prefabs |
In the Select GameObject menu, pick your new prefab.
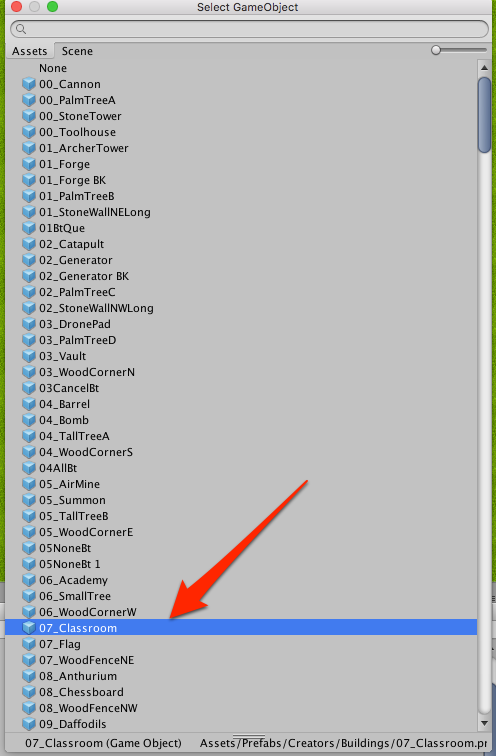
Click to view larger.
You'll see the Element 0 item has been updated.
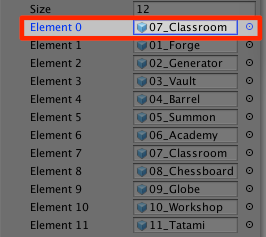
Click to view larger.
That's it. You've replaced all of the instances of the prefab in the kit base and also the battle scene.
What should I do next?
To customize all of the buildings, we recommend you work with the existing samples included in the kit first. It's more straightforward to customize a resource building into a resource building rather than converting a resource building into a defense structure (rather, customize the defense buildings into new defense buildings)
There are a few specific changes necessary to do in the scripts for some XML settings like Resource generation, resource storage, military unit storage, or builder huts. See the sections below...
Script changes for resource generator and storage builings...
If you would like to customize a resource structure - see the Buildings > Resource Generators or Resource Storage documentation which describes the scripts that disperse and store with resources. You'll need to make minor changes to the structure names in these scripts if you customize any of the existing prefabs or want to add more.
Script changes for unit storage structures...
If you would like to customize a military unit storage structure - see the Buildings > Military documentation which describes the small references in scripts you need to edit if you make changes to the structure names in these scripts if you customize any of the existing prefabs or want to add more.
Script changes for builder huts....
If you would like to add more structures like the dobbit builder tool house builder hut that expand the number of builders, see the Buildings > Builder Hut documentation for minor script changes you'll need to make.
What about adding more game structures?
To add additional structures to the kit, we recommend you first replace the existing samples. If you have more structures than we've provided as examples, continue the same the same naming conventions and design as the existing structures. But save this for later - first we recommend you get comfortable prototyping with the existing structure before attempting to add new structures. If you understand the fundamentals of how everything connects together - the rest is a breeze.
Updated less than a minute ago
