Part 1: Create Unit Prefabs
Reminder - Keep Daily Backups
When working on a strategy game with a kit as big as the Complete Kit - always keep a working daily backup! Save yourself the trouble of rolling-back changes and losing work.
What are unit prefabs?
Every character in your game needs to be setup as a prefab. We've got 7 examples already setup in the game for you, they are as follows:
| Unit | Prefab |
|---|---|
| Alien | Alien.prefab |
| Handyman | HandyMan.prefab |
| Dobbit | Dobbit.prefab (Hometown NPC)/DobbitSoldier.prefab (Army Battle) |
| Viking | Viking.prefab |
| Hydra | Hydra.prefab |
| Mage | Mage.prefab |
| Archer | Archer.prefab |
Create Your Own Unit Prefab Video Demo
The following video demo explains how to create your unit prefabs. We use the Alien unit files which are available for download in the CityBuildingKit.com download center.
Getting Started...
Before adding new characters, take a look at how our example character is structured.
First, you will need sprite sheets for the new characters. These are either hand-drawn, or 3D renders from different angles with the character walking or performing different tasks. Our sprite sheets are in Sprites_TK2D (Assets\Sprites_TK2D\Units\Dobbit\walk).
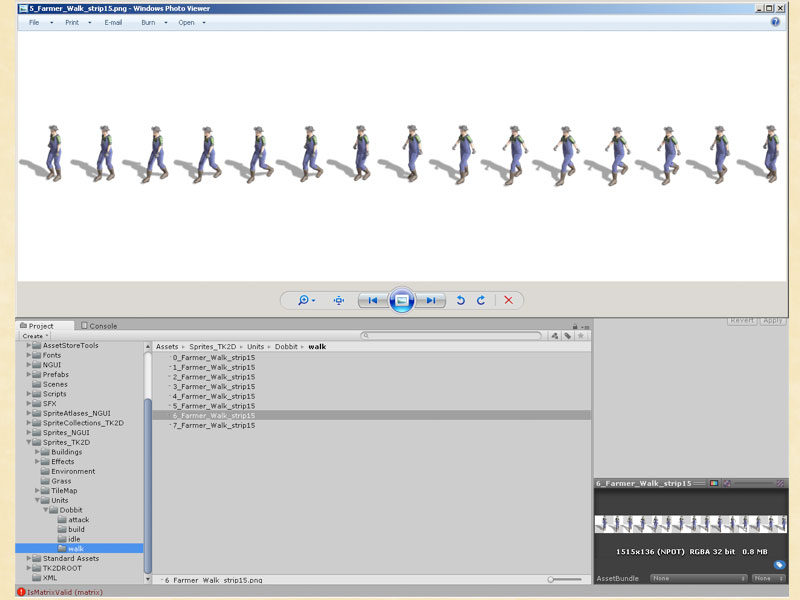
Click on image to view larger. Assets\Sprites_TK2D\Units\Dobbit\walk sprite sheet
Here is a great tutorial from Digital Tutors for creating the sprite sheets:
We use a software called Texture Packer and we talk about how to get setup with it on the next doc.
Then, you will need to create 2D Toolkit sprite collections and sprite animations.
Assets\SpriteCollections_TK2D\Units\Animated\Dobbit\HIQ
	HIQ_dobbit_walk
	HIQ_dobbit_walk_animation
Copy the sprite sheet in Assets\Sprites_TK2D\Units<Name of character> Folder
Create a new folder in Assets\SpriteCollections_TK2D\Units\Animated<Folder with same name>. Create new sprite collections and rename them Idle, Shoot, Walk to keep things organized – due to the high number of frames (not recommended), we had to split the sprite collections.
Open one, create 8 empty sprite sheets and drag the appropriate images, into the Texture slot. Press Setup for each as you drag each in.
Fill in the individual sprite Width / Height, Pad Black Zero Alpha and press Apply. This will separate the sprite sheet into individual sprites
for the atlas. Delete the last empty sprites(if any).
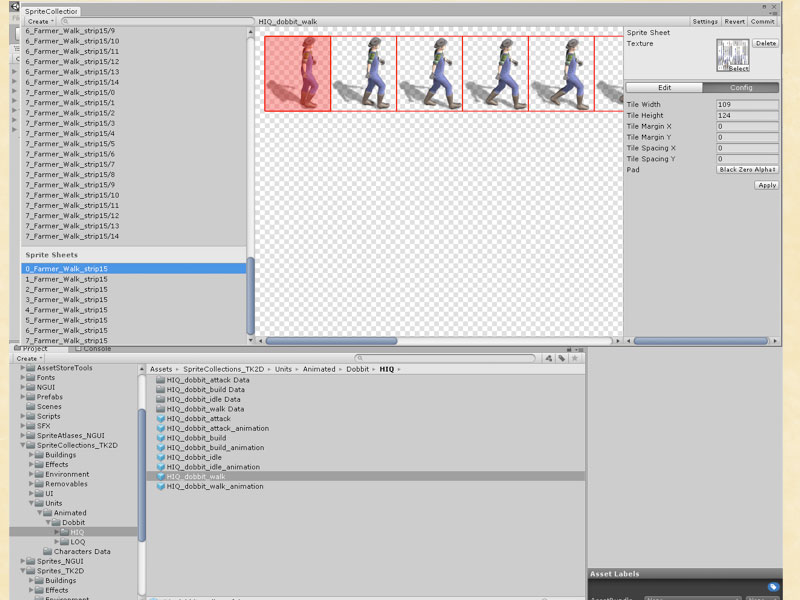
Click on image to view larger. Individual animation frames with 2D Toolkit
We have split our collections based on actions (walk, idle, etc), but you can basically insert all sprite sheets/animations into one collection/animation, provided that the size of the resulting atlas image doesn't exceed the maximum allowed dimension.
To make best use of the image atlas, you can dice each frame. Select all sprites, Render Mesh Diced, Apply to dice all sprites and hit Commit to create the Sprite Collection.
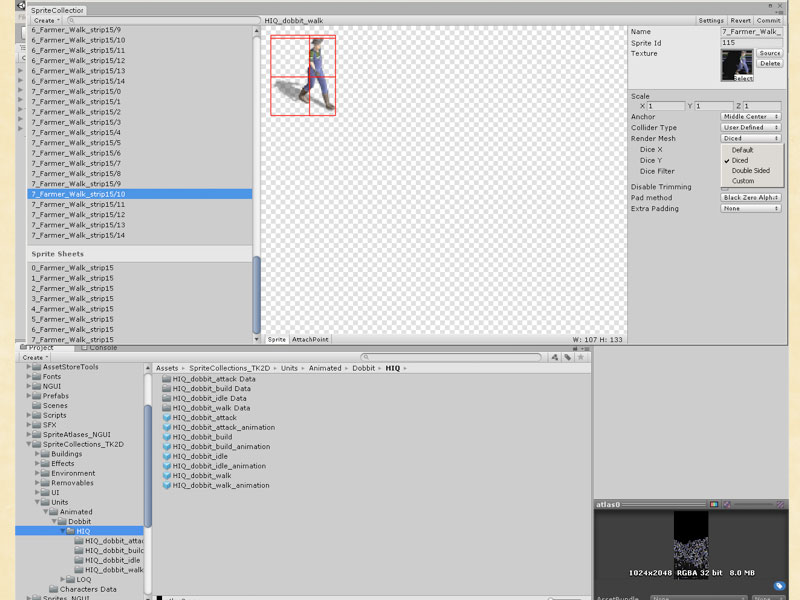
Click on image to view larger. Diced frame example
The frames are diced for better use of the sprite collection texture.
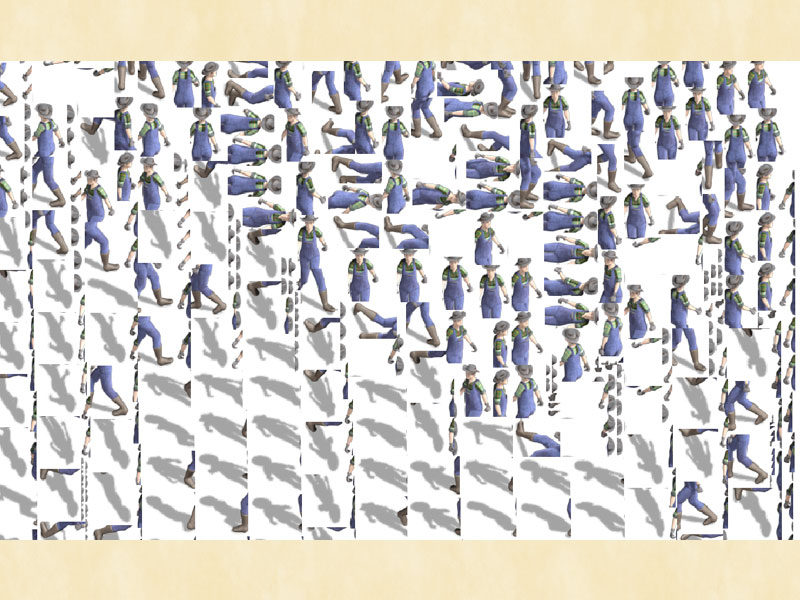
Click on image to view larger. Diced Atlas Image
Then, take a look at our soldier prefab (Assets\Prefabs\Creators\Units\DobbitSoldier.prefab).
Based on how our simple dobbit animation controller is configured, you will need 3 separate sprite animations, for Idle, Attack and Walk.
The clips inside are called Idle or Attack or Walk_ + direction – N,S,E,W, NE,NW,SE,SW (North, South, etc)
The basic components of an animated character are a 2D Toolkit Sprite and a Sprite Animator. Then, a series of controllers, the animation controller and other elements that make the character walk, change direction, attack, etc.
How to test animated units that I import?
In the Scripts/Units/AnimController.cs Update() function there is a commented paragraph for manually testing animation/direction of units. Below is an excerpt.
// Scripts/Units/AnimController.cs
// Function is commented out, but this will allow you to
// Manually control units and test them with key presses
// Movement keys: F R E W S X C
// Animation Keys: I O K L
//
void Update () {

	//Manual controller to check animations
	/*
	bool animChanged = false;
	if(Input.anyKey){ animChanged = true; }

	if(Input.GetKey(KeyCode.F)){ direction = "E"; }
	else if(Input.GetKey(KeyCode.R)){ direction = "NE"; }
	else if(Input.GetKey(KeyCode.E)){ direction = "N"; }
	else if(Input.GetKey(KeyCode.W)){ direction = "NW"; }
	else if(Input.GetKey(KeyCode.S)){ direction = "W"; }
	else if(Input.GetKey(KeyCode.Z)){ direction = "SW"; }
	else if(Input.GetKey(KeyCode.X)){ direction = "S"; }
	else if(Input.GetKey(KeyCode.C)){ direction = "SE"; }

	if(Input.GetKey(KeyCode.I)){action = "Idle"; animator.Library = idleAnimation;		}
	else if(Input.GetKey(KeyCode.O)){action = "Walk"; animator.Library = walkAnimation;		}
	else if(Input.GetKey(KeyCode.K)){action = "Attack"; animator.Library = attackAnimation;		}
	else if(Input.GetKey(KeyCode.L)){action = "Build"; animator.Library = buildAnimation;		}

	if(animChanged){UpdateCharacterAnimation();}
	*/
}
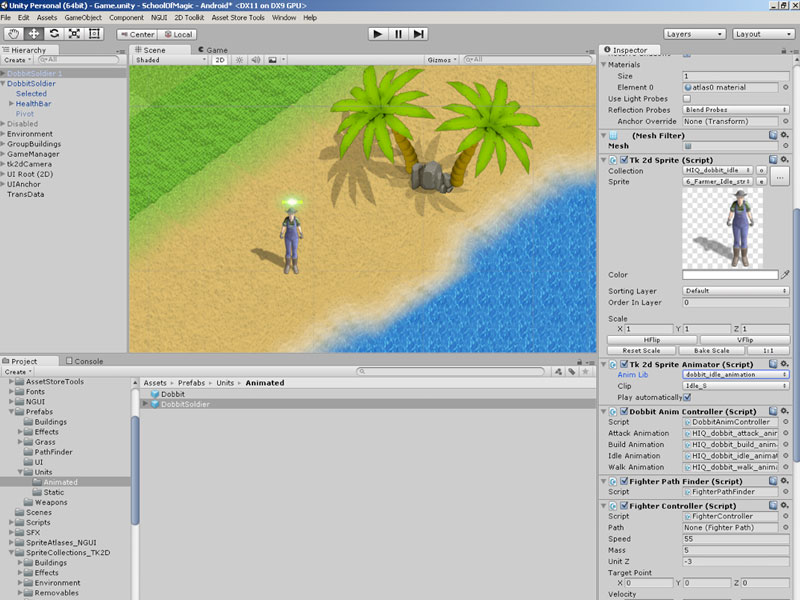
Click on image to view larger. Manually Testing Your Character
At the time of this writing, there are seven animated characters in our kit as listed in the chart above. Study how these examples work.
For NPC demonstrations, look at how the Construction Dobbit follows a fixed path around construction objects, while the soldier dobbit prefab is much more versatile for battle.
How do I setup my XML?
Now, we need to update the units.xml file. This is pretty simple to do, since all you're editing here is the name and description plus prices and time. Settings that are imported by the game and aren't too critical.
There's only one thing to remember - keep the same order in the XML as your prefab order in Unity.
XML Order Must Match Prefab Order in Unity
Always keep the same order in all menus/XML files for all structures or units.
The order in the XML file must match the order of units in the store. The first 5 units (starting with the Alien) appear on the top and the last 5 units (starting with the Mage) appear on the bottom of the menu. If you've changed the units in your UIAnchor ArmyMenu, this order must be the same in your XML or else things will get mixed up.
Also, later in documentation page Part 2: Update Units Menus the order of elements in the Inspector prefab array must match the same order you've used in the XML or else you'll find units get accidentally mixed up.
The following is a sample of the first XML item in the document, which matches the first prefab in Unity.
<Unit>
		<Name>Green Alien</Name>
    <!--  name displayed in the store -->

		<UnitType>Alien</UnitType>
    <!--  IMPORTANT: this same as prefab - instead of clutting the labels list you set the prefab name here in the XML. Prettier right? -->

		<Description>A smelly alien, green with envy. Maybe it's something he ate?</Description>
    <!--  description displayed in the store -->

		<Currency>Mana</Currency>
    <!-- either Gold, Mana, or Crystals to buy -->

		<Price>50</Price>
    <!-- amount of resource necessary to pay for the unit-->

		<TimeToBuild>1</TimeToBuild>
    <!-- the time (in minutes) needed to create the unit -->

		<Life>200</Life>
    <!-- HP of this unit -->

		<Size>1</Size>
    <!--how many population slots the unit occupies-->
    <!--by default it is 1, but you can increase this like 3, 5, 10, etc. -->

		<XpAward>100</XpAward>
    <!-- experience awarded for the completion of an object -->
	</Unit>
Where do I instantiate my units?
Units are instantiated in Scripts/Menus/Army/MenuArmyBattle.cs in the InstantiateUnit() function. This has different cases for each of the units you've setup in your XML/units.xml file that prefills the store with your units.
Make sure the index here matches your XML/units.xml file part-for-part.
For example, "Unit" or "Dobbit" or "Soldier" tag applies to all units, and is used for target identification. The kit uses the default "Dobbit" tag for all units but for ease of understanding, it should actually be changed to "Unit" as we've written in the below examples.
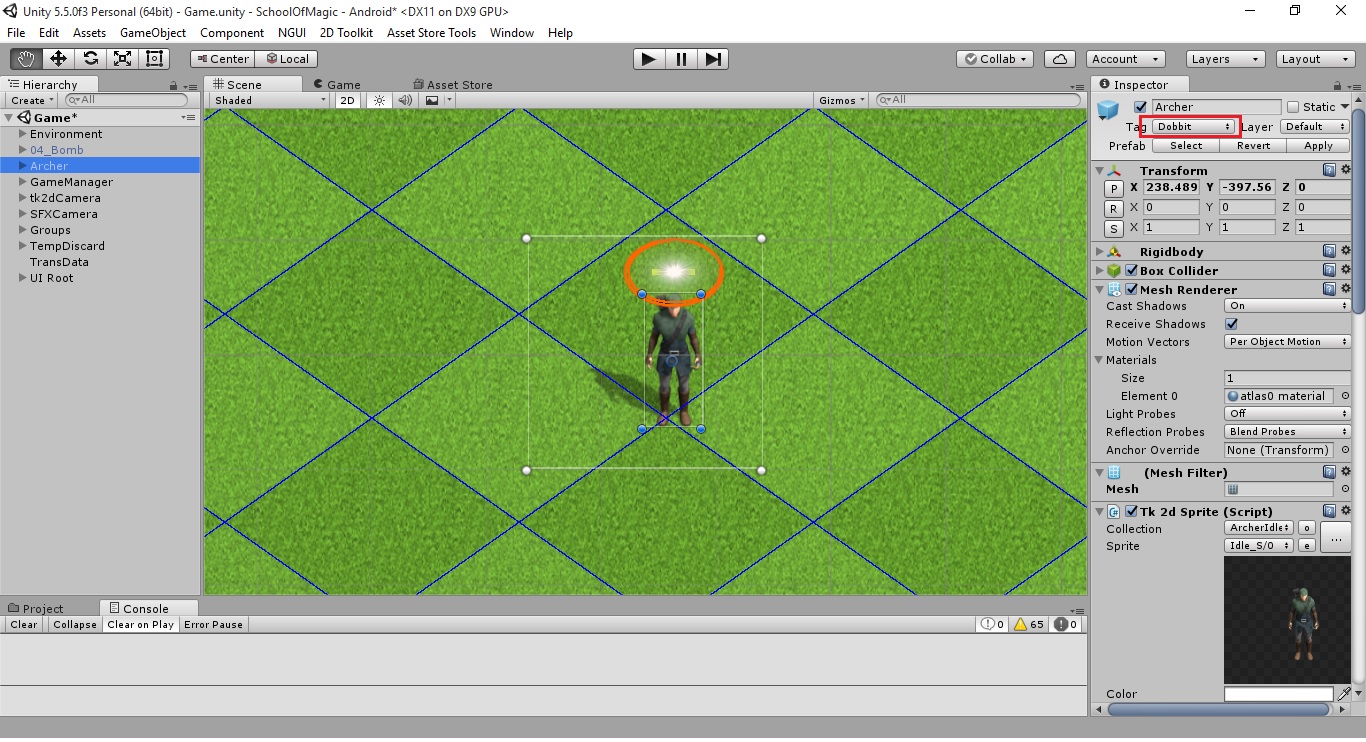
The kit uses the default "Dobbit" tag for all unit. Click to view larger.
// Scripts/Menus/Army/MenuArmyBattle.cs
// The following function is triggered after a unit is deployed
// in battle. The cases are included for the characters
//
// Depending on which unit is clicked in the menu
// It will send the game object tag to ProcessUnit()
// Which loads the correct game object. If no object exists
// ProcessUnit() will default with the dobbit (builder/farmer) character
// As of this time, the values carried
//
	private void InstantiateUnit(int index, float speedModifier)
	{
		switch (index)
		{
		case 0:
        // Instantiates the first UnitPrefab (Element 0) from the array
			GameObject Wizard = (GameObject)Instantiate (UnitPrefabs [0], spawnPoint, Quaternion.identity);
			ProcessUnit ("Unit", speedModifier); //As of now, what you type in the first function variable (Unit, or Wizard, etc.) doesn't matter
		break;

		case 1:
        // Instantiates the first UnitPrefab (Element 1) from the array
			GameObject Chicken = (GameObject)Instantiate (UnitPrefabs [1], spawnPoint, Quaternion.identity);
			ProcessUnit ("Unit", speedModifier); //As of now, what you type in the first function variable (Unit, or Wizard, etc.) doesn't matter
			break;

		case 2:
        // Instantiates the first UnitPrefab (Element 2) from the array
			GameObject ClockTree = (GameObject)Instantiate (UnitPrefabs [2], spawnPoint, Quaternion.identity);
			ProcessUnit ("Unit", speedModifier); //As of now, what you type in the first function variable (Unit, or Wizard, etc.) doesn't matter
		break;

		case 3:
			GameObject Mine = (GameObject)Instantiate (UnitPrefabs [3], spawnPoint, Quaternion.identity);
			ProcessUnit ("Unit", speedModifier); //As of now, what you type in the first function variable (Unit, or Wizard, etc.) doesn't matter
			break;

		case 4:
			GameObject Gargoyle = (GameObject)Instantiate (UnitPrefabs [4], spawnPoint, Quaternion.identity);
			ProcessUnit ("Unit", speedModifier); //As of now, what you type in the first function variable (Unit, or Wizard, etc.) doesn't matter
			break;

		case 5:
			GameObject Colossus = (GameObject)Instantiate (UnitPrefabs [5], spawnPoint, Quaternion.identity);
			ProcessUnit ("Unit", speedModifier); //As of now, what you type in the first function variable (Unit, or Wizard, etc.) doesn't matter
			break;

		case 6:
			GameObject Monster = (GameObject)Instantiate (UnitPrefabs [6], spawnPoint, Quaternion.identity);
			ProcessUnit ("Unit", speedModifier); //As of now, what you type in the first function variable (Unit, or Wizard, etc.) doesn't matter
			break;

		case 7:
			GameObject Porcupiner = (GameObject)Instantiate (UnitPrefabs [7], spawnPoint, Quaternion.identity);
			ProcessUnit ("Unit", speedModifier); //As of now, what you type in the first function variable (Unit, or Wizard, etc.) doesn't matter
			break;

		case 8:
			GameObject Jelly = (GameObject)Instantiate (UnitPrefabs [8], spawnPoint, Quaternion.identity);
			ProcessUnit ("Unit", speedModifier); //As of now, what you type in the first function variable (Unit, or Wizard, etc.) doesn't matter
			break;

		case 9:
			GameObject Wisp = (GameObject)Instantiate (UnitPrefabs [9], spawnPoint, Quaternion.identity);
			ProcessUnit ("Unit", speedModifier); //As of now, what you type in the first function variable (Unit, or Wizard, etc.) doesn't matter
			break;

		case 10:
			GameObject Phoenix = (GameObject)Instantiate (UnitPrefabs [10], spawnPoint, Quaternion.identity);
			ProcessUnit ("Unit", speedModifier); //As of now, what you type in the first function variable (Unit, or Wizard, etc.) doesn't matter
			break;

		case 11:
			GameObject Dragon = (GameObject)Instantiate (UnitPrefabs [11], spawnPoint, Quaternion.identity);
			ProcessUnit ("Unit", speedModifier); //As of now, what you type in the first function variable (Unit, or Wizard, etc.) doesn't matter
			break;
		}
	}
The respective unit is processed, but if you don't have your unit prefab in the UnitPrefabs[] array, by default the dobbit character is instantiated/processed. Just comment the unitType = “Dobbit”; statement and insert other prefabs into the cases above in InstantiateUnit() to process all your new characters.
// Scripts/Menus/Army/MenuArmyBattle.cs
// Called by the InstantiateUnit() function
// with the unit object tag
//


	private void ProcessUnit(string unitType, float speedModifier)
	{
    // Game objects with the tag of soldier
    // Your kit may say something like dobbit. That doesn't matter
    // This is just a common tag that all unit game object prefabs should have
		unitType = "Soldier";

	// Locate the game objects
		GameObject[] units = GameObject.FindGameObjectsWithTag(unitType);

    // For the number of units the player wants to deploy
		for (int i = 0; i < units.Length; i++)
		{
			if(((Selector)units[i].GetComponent("Selector")).isSelected)
			{
        // Assign the unit to a group,
        // setup a faster speed so they separate faster,
        // and instantiate the units on the map
				units[i].transform.parent = GroupUnits.transform;
				units[i].GetComponent<FighterController>().speed += speedModifier;
				units[i].GetComponent<FighterController>().assignedToGroup = ((Helios)helios).selectedGroupIndex;

        // Instantiate a new unit with it's own unique unit index number
				tempList.Add(units[i]);
				((Helios)helios).DeployedUnits.Add(units[i]);
				((Helios)helios).instantiationUnitIndex++;
				units[i].GetComponent<Selector>().index = ((Helios)helios).instantiationUnitIndex;
				((Selector)units[i].GetComponent("Selector")).isSelected = false;
				break;
			}
		}
	}
Here's an example with a cop soldier unit.
Change the Sprite collections and add the animation clips. Since the Build animation was necessary only for the dobbit builder, it will not be processed during combat, you can add the idle cop animation. Drag this to the CopSoldier prefab to replace it (make sure you don't overwrite the dobbit soldier prefab). You might want to change the “bullet” in the Shooter script - the projectile that the unit is launching.
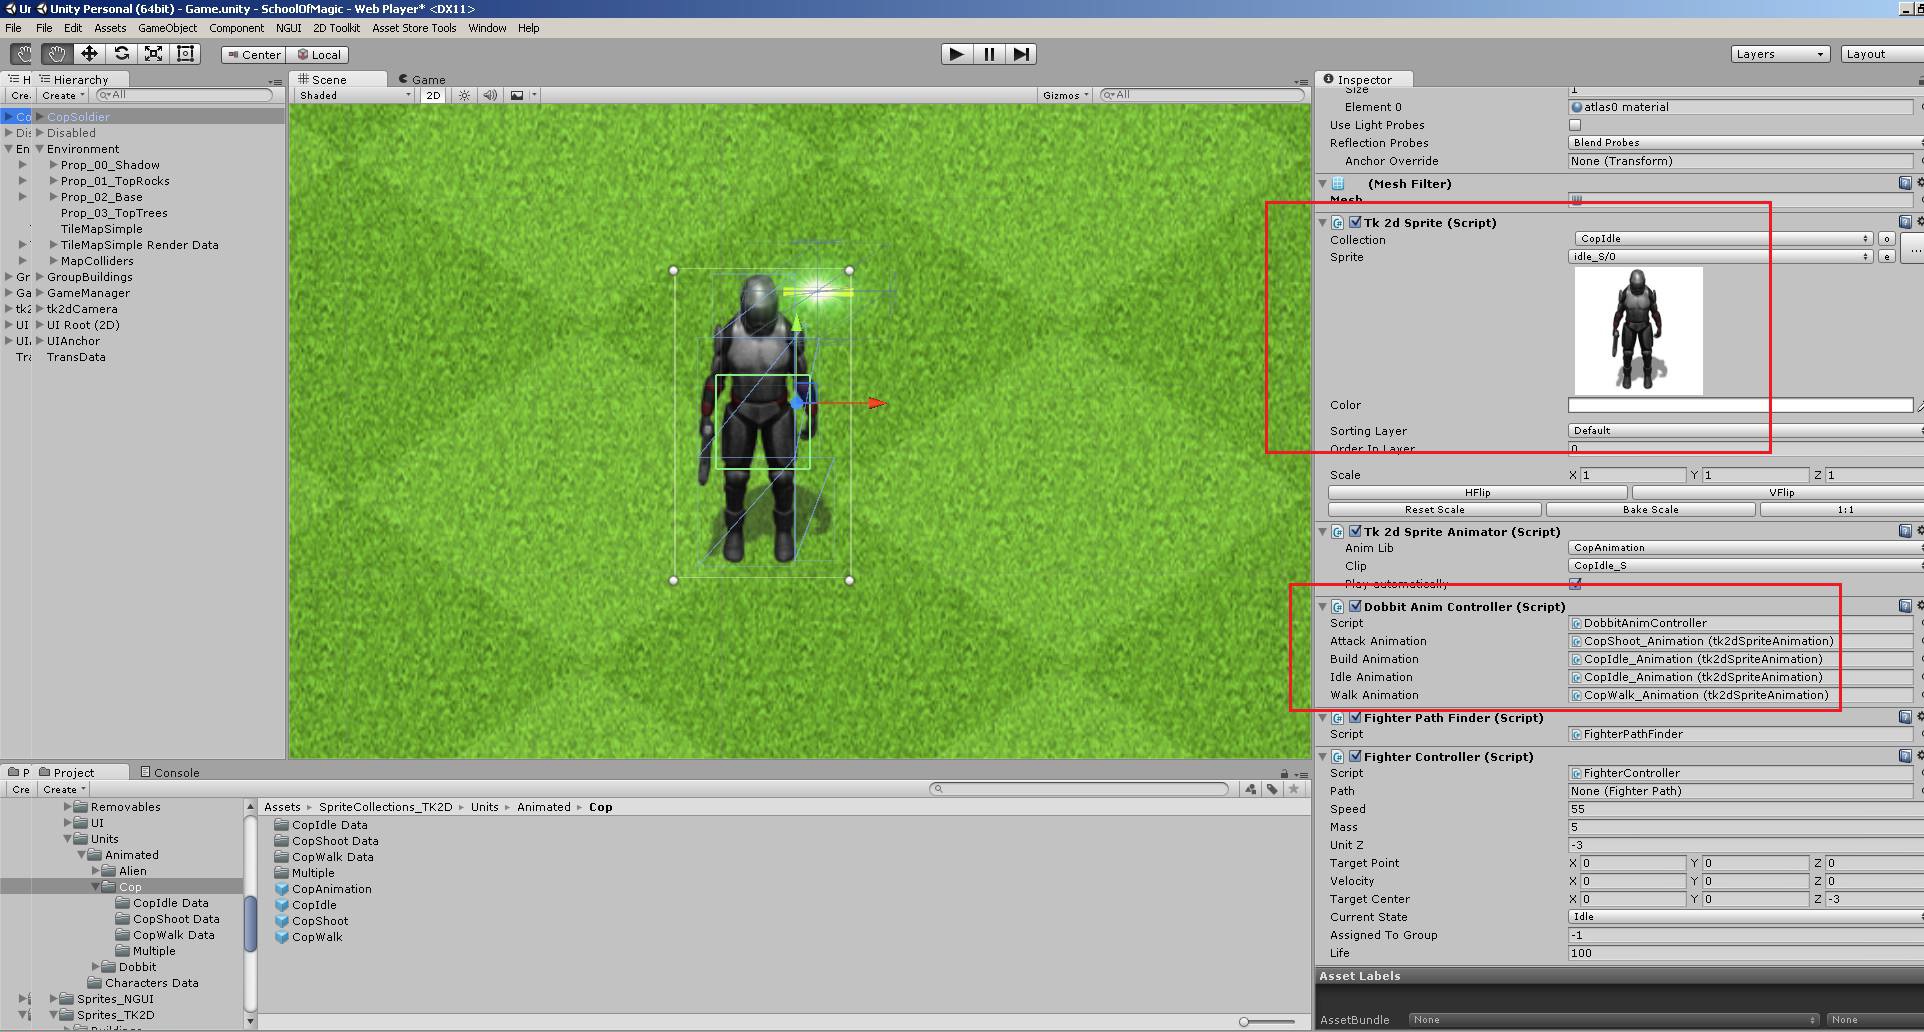
Click on image to view larger
Open the Map01 scene, and in UIAnchor/UnitsBattle locate the unit either in Page0 or Page1 and replace the 01Graphics/SpPic sprite. In the below image excerpt you'll see where the alien sprite is located.
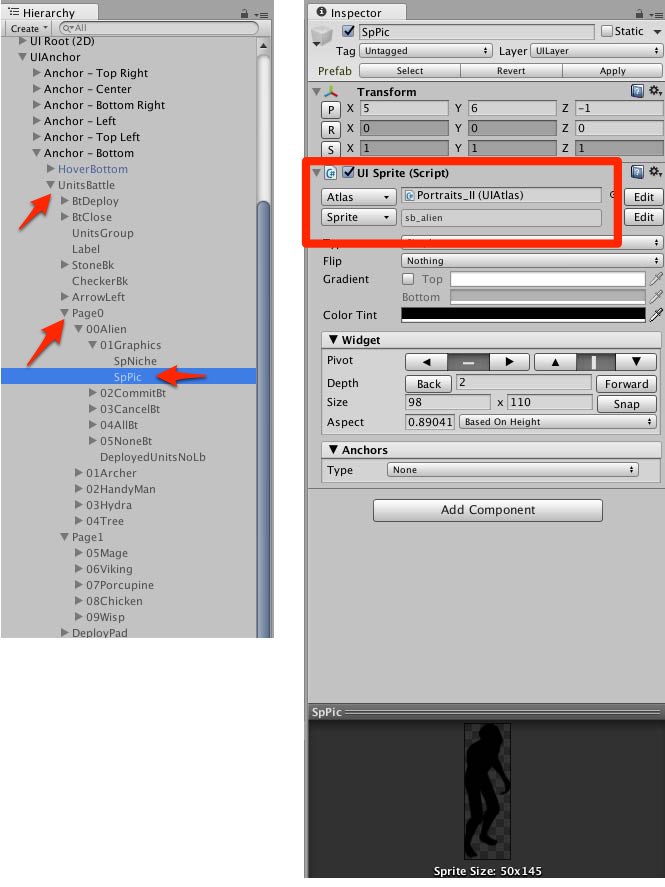
Click on image to view larger
In the Map01 scene, activate the UnitsBattle menu, and, in the Anchor - Bottom > UnitsBattle menu, drag your prefab, for example the new cop prefab into the existing unit slot you want to replace. Deactivate the menu, and launch the game.
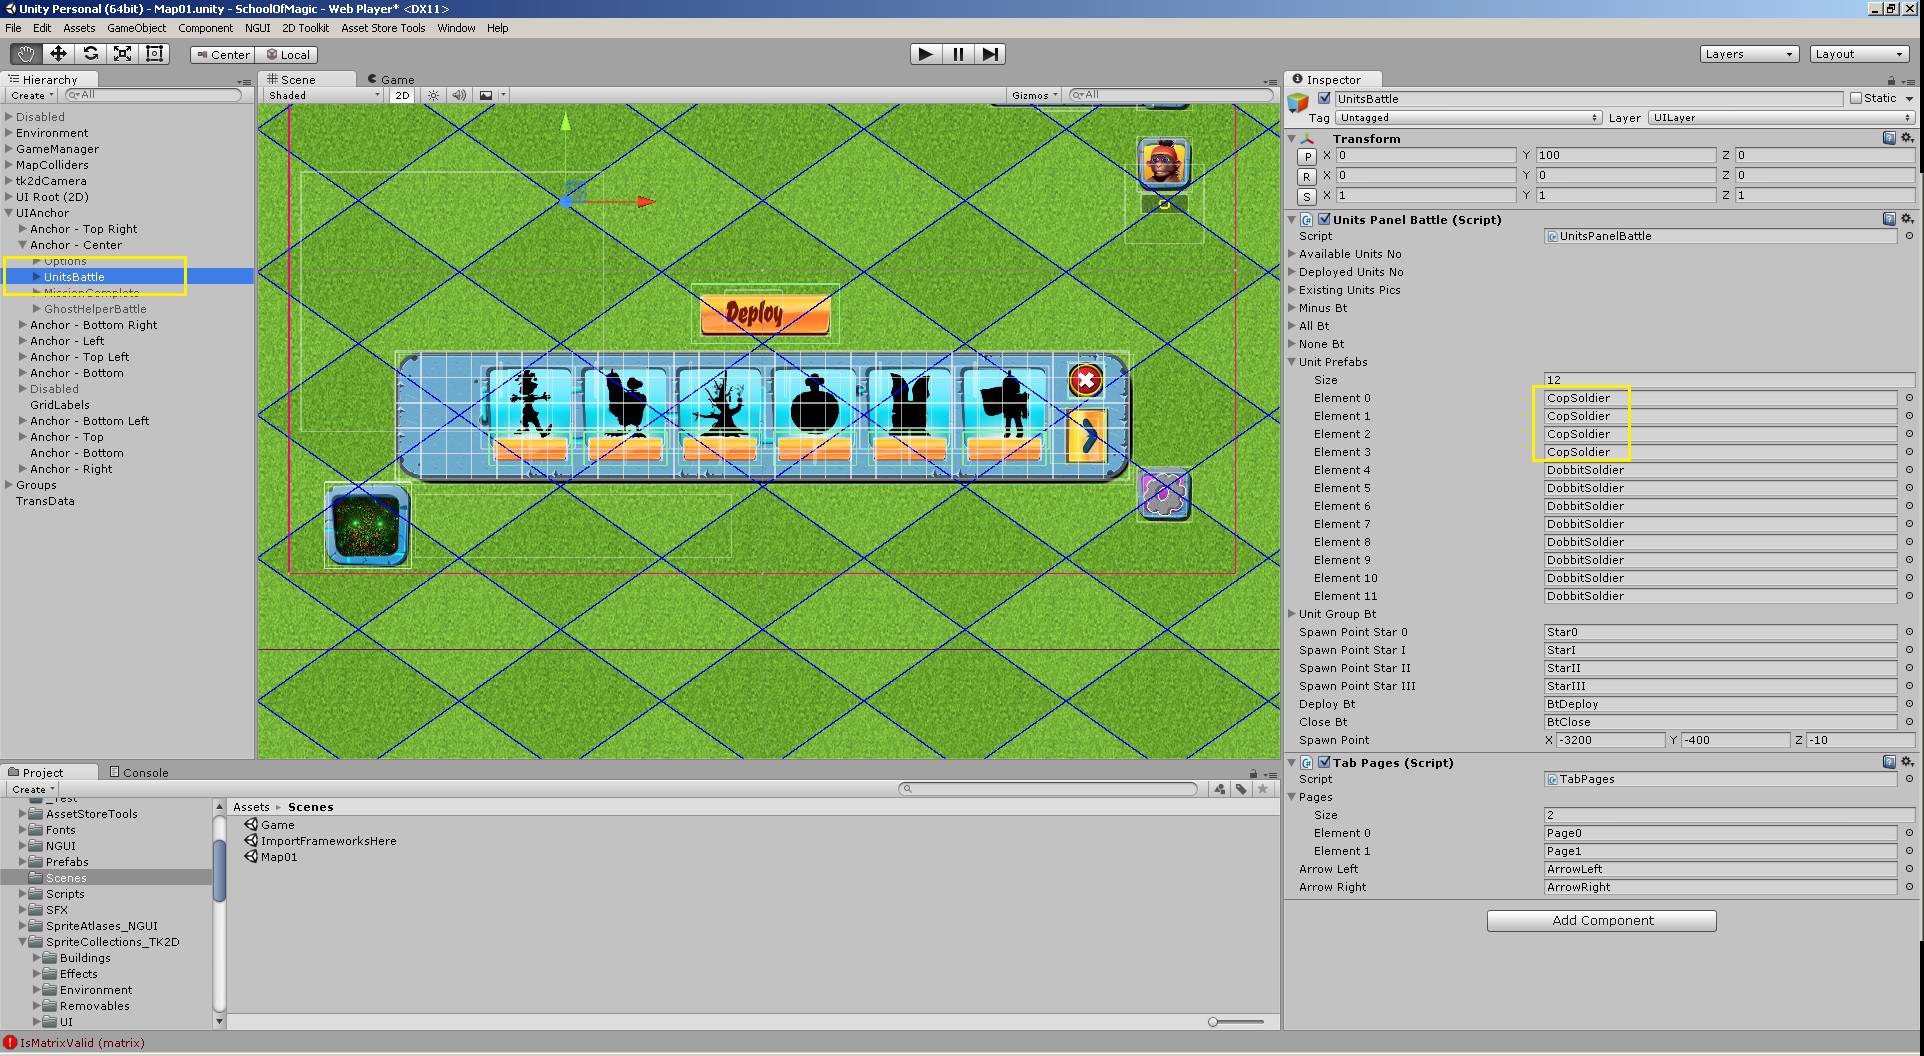
Click on image to view larger
Activate the TransData game object in the Map01 hierarchy and press play to load a random map directly rather than going back to the Game scene to play the game. Make sure to deactivate the TransData game object when done.
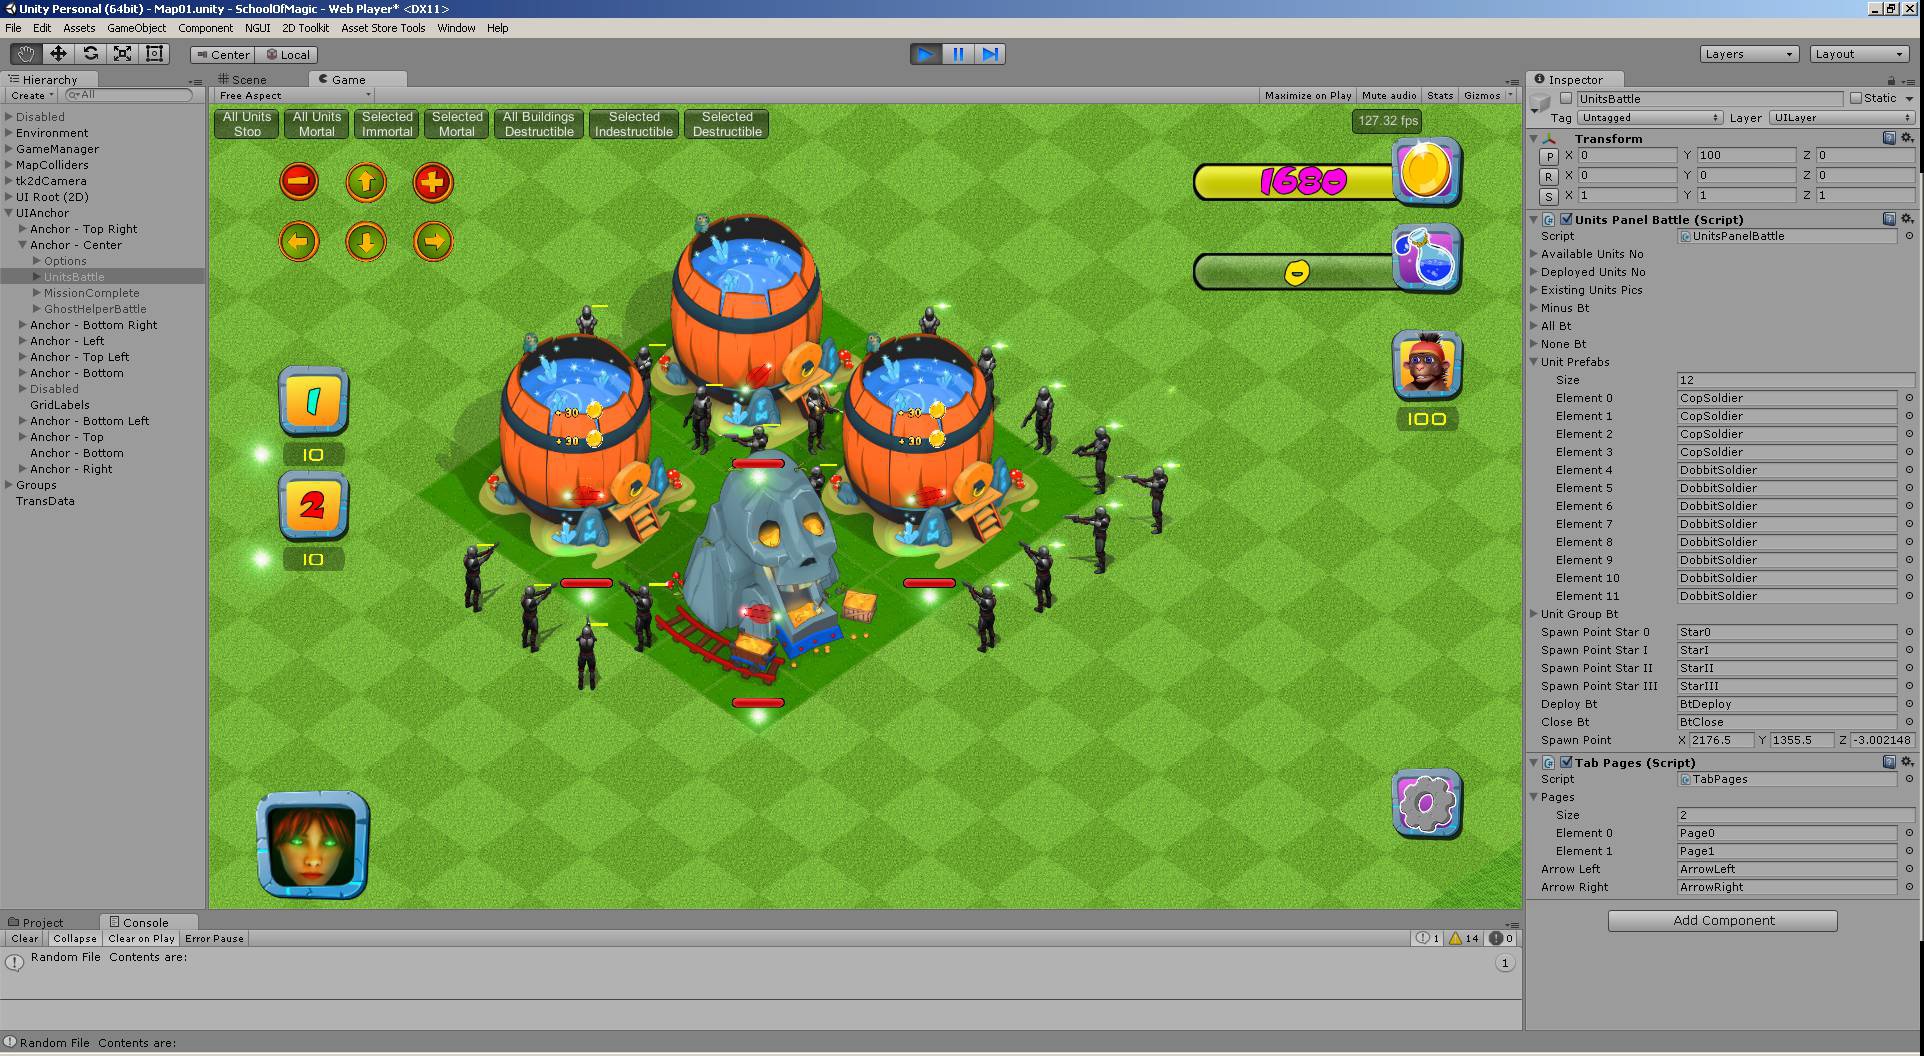
Click on image to view larger
HINT: In case you do not see the unit, it may be related to scaling, try scaling it up by 100.
Next, continue to Part 2 to update the Unit menus in the Game scene
After you have setup the prefab in the battle map, we can return to the game scene to customize the menus. Continue to Part 2: Update Unit Menus in the documentation links on the left.
Want to know more about 2DTK? Watch these Tutorial Videos
To learn more about sprites and animations with 2DTK, watch the videos below or see the 2DTK documentation (for example this one on creating sprite collection)
Updated less than a minute ago
